
Mastering Your Digital Footprint: Unlocking UTM Parameters in Google Analytics 4
Last Modified on February 17, 2025
In the intricate landscape of digital marketing, understanding the precise origins and performance of website traffic is paramount. As businesses increasingly rely on data-driven strategies, UTM parameters emerge as an indispensable tool, acting as digital breadcrumbs that illuminate the journey of every visitor. Especially with the advent of Google Analytics 4 (GA4), mastering the creation, implementation, and, crucially, the analysis of these parameters has become a core competency for marketers and analysts alike.

While numerous resources guide users through the process of creating UTM-tagged links, a common challenge persists: effectively locating and interpreting this rich data within the GA4 ecosystem. This article aims to bridge that gap, providing a comprehensive guide to navigating GA4’s robust reporting features to fully leverage your UTM data. We’ll delve into two primary methods for viewing your UTMs, explore their respective use cases, and outline best practices to ensure your traffic attribution is always crystal clear.
This guide will cover:

- What UTM Parameters are and why they are vital.
- Where and how they can be effectively utilized.
- Best practices for consistent and accurate tagging.
- A detailed walkthrough of viewing UTM data in GA4’s standard reports.
- Advanced analysis techniques using GA4’s powerful Exploration Reports.
- Strategies for extending UTM functionality, including custom parameters and CRM integration.
- Troubleshooting common issues like misattributed traffic.
Let’s dive into the world of precise traffic attribution and unlock the full potential of your digital campaigns.
What are UTM Parameters?
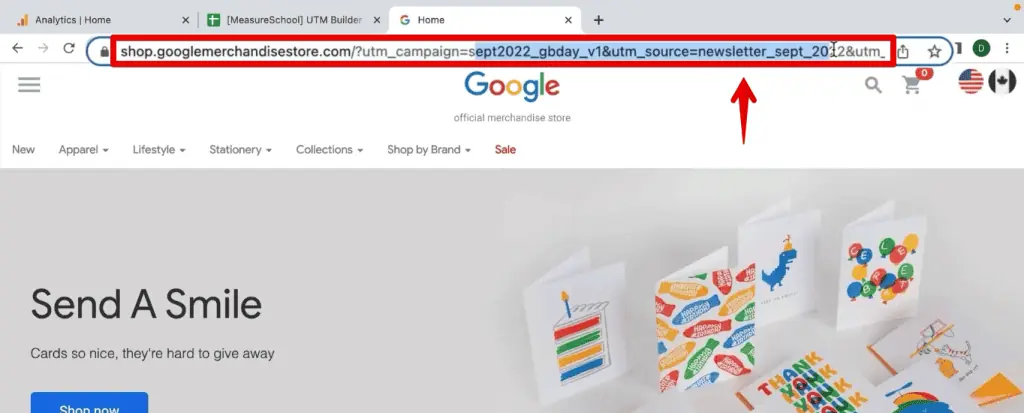
You’ve likely encountered a string of peculiar characters appended to a web address, transforming a clean URL like https://example.com/product into something akin to https://example.com/product?utm_source=newsletter&utm_medium=email&utm_campaign=summer_sale&utm_content=hero_banner. These are UTM parameters – Urchin Tracking Module parameters – small pieces of code added to URLs. They are fundamental in marketing and web analytics, designed to provide granular detail about the origin and context of incoming website traffic.
Essentially, UTM parameters enable marketers to answer critical questions about their traffic:
utm_source: Identifies the origin of your traffic (e.g.,facebook,google,newsletter).utm_medium: Specifies the marketing medium (e.g.,cpc,email,social,display).utm_campaign: Denotes the specific campaign or promotion (e.g.,summer_sale,product_launch,q4_promo).utm_term(Optional): Used to track keywords for paid search campaigns.utm_content(Optional): Distinguishes between different ad versions or links within the same campaign (e.g.,text_link,banner_ad,button_a).utm_id(Optional): Links to a specific campaign ID in your internal systems.utm_source_platform(Optional): Indicates the platform where the traffic originated (e.g.,google_ads,meta_ads).
While UTM parameters are not recommended for internal linking (as they can overwrite existing session data), they are indispensable for tracking external links that direct users to your website. By consistently applying these codes, you gain an unparalleled understanding of the "who," "how," and "what" behind your traffic sources, moving beyond generic channel groupings to precise campaign performance.
Why are They Indispensable for Digital Marketers?
The utility of UTM parameters extends far beyond simple traffic identification; they are the bedrock of effective campaign measurement and optimization. Without them, marketers operate in a fog, making assumptions about which efforts are truly driving results.
Consider a scenario where you’re simultaneously running a product promotion across Facebook ads, LinkedIn posts, and Google Search Ads, all directing users to the same landing page. If 1,000 users visit and purchase your product without UTMs, all you would know is the total number of visits and conversions. This aggregate data offers little insight into individual channel performance.
With UTM codes, however, you can slice and dice this data with precision. For example, you might discover:
- Facebook Ads (
utm_source=facebook,utm_medium=cpc,utm_campaign=product_promo) drove 500 visits and 100 purchases. - LinkedIn Organic Posts (
utm_source=linkedin,utm_medium=social,utm_campaign=product_promo) generated 300 visits and 30 purchases. - Google Search Ads (
utm_source=google,utm_medium=cpc,utm_campaign=product_promo) brought in 200 visits and 70 purchases.
This granular detail is transformative. It enables you to:

- Optimize Ad Spend: Reallocate budget from underperforming channels to those delivering higher ROI.
- Refine Content Strategy: Understand which specific creatives or call-to-actions (tracked via
utm_content) resonate most with your audience. - Improve User Experience: Identify if traffic from certain sources or campaigns exhibits different on-site behavior, hinting at content alignment issues.
- Measure ROI Accurately: Link specific marketing efforts directly to conversions and revenue, proving the value of your campaigns.
- Conduct A/B Testing: Compare different versions of a link, ad, or email by using distinct
utm_contentvalues to determine which performs better.
Where Can They be Deployed?
UTM parameters offer universal applicability across virtually any platform where you share a link directing users to your website. Their versatility makes them a cornerstone of integrated marketing strategies.
Common applications include:
- Email Marketing: Track opens, clicks, and conversions from newsletters, promotional emails, and automated sequences.
- Social Media: Monitor the effectiveness of organic posts and paid advertisements on platforms like Facebook, Instagram, LinkedIn, X (formerly Twitter), and Pinterest.
- Paid Advertising: Essential for Google Ads, Microsoft Ads, and other programmatic advertising platforms to supplement auto-tagging or for non-auto-tagged campaigns.
- Referral Programs: Attribute traffic and conversions from affiliate links, partner websites, or influencer campaigns.
- Content Marketing: Measure the performance of guest posts, syndicated articles, and external publications.
- Offline Campaigns (with QR Codes): By embedding UTM-tagged URLs into QR codes on print ads, flyers, or product packaging, you can bridge the gap between offline and online performance.
- Press Releases: Track the impact of media mentions and news coverage.
Essentially, if you are sharing a link that leads to your website, adding UTM parameters ensures you gain maximum insight into its performance.
Common Use Case Scenarios
To further illustrate their power, here are specific scenarios where UTM parameters prove invaluable:
- Product Launches: Track traffic from various pre-launch teasers, official announcement emails, and social media blitzes to see which channels generated the most initial interest.
- Seasonal Sales & Promotions: Differentiate between traffic from your Black Friday email campaign versus your Black Friday social media ads, even if they promote the same landing page.
- Content Promotion: Understand which distribution channels (e.g., Twitter share, LinkedIn group post, internal email to subscribers) are most effective for driving engagement with a new blog post or whitepaper.
- A/B Testing Ad Copy/Creatives: Use
utm_contentto compare two different headlines or images for the same ad campaign to see which drives more clicks or conversions. - Influencer Marketing Campaigns: Assign unique
utm_sourcevalues to each influencer to measure their individual impact on your website traffic and sales. - Webinar Registrations: Track the source (e.g.,
facebook_group,partner_website) and medium (e.g.,social,referral) that lead to webinar sign-ups.
Best Practices for UTM Parameters
Effective UTM tagging requires discipline and consistency. Adhering to best practices ensures your data is clean, actionable, and provides accurate insights.
- Develop a Naming Convention: Establish a clear, standardized system for naming your
utm_source,utm_medium, andutm_campaignvalues. This prevents fragmentation (e.g.,facebookvs.Facebook) and ensures easy analysis. Share this convention with your entire marketing team. - Use Consistent Case: Always use lowercase for all your UTM values (e.g.,
email, notEmailorEMAIL). GA4 is case-sensitive, soFacebookandfacebookwill be reported as two separate sources. - Be Specific and Descriptive: Your parameters should clearly indicate what they represent.
utm_campaign=winter_sale_2024is far more useful thanutm_campaign=promo. Similarly,utm_content=hero_banner_ais better thanutm_content=banner. - Avoid Spaces and Special Characters: Use underscores (
_) or hyphens (-) instead of spaces (e.g.,summer_sale, notsummer sale). Avoid special characters like!@#$%^&*as they can break your URLs or tracking. - Only for External Links: As mentioned, do not use UTMs for internal links within your website. This can overwrite existing session data and distort attribution.
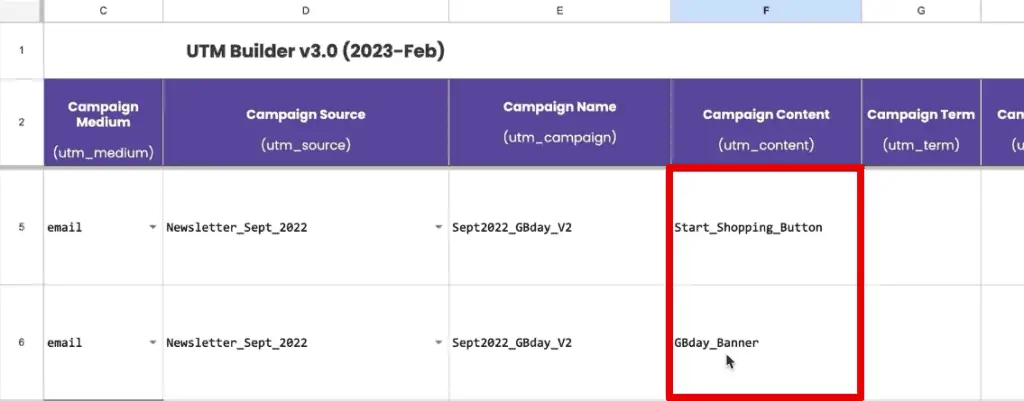
- Document Everything: Maintain a centralized spreadsheet or tool (like a UTM builder) where all your tagged URLs are recorded. This is crucial for large teams and complex campaigns to ensure consistency and facilitate future analysis.
- Use Shorteners Wisely: While URL shorteners can clean up long UTM-tagged URLs, ensure they don’t strip the parameters or interfere with tracking. Many UTM builder tools offer integrated shortening.
UTM Parameters in the GA4 Ecosystem
Google Analytics 4 represents a significant shift from its predecessor, Universal Analytics, particularly in its event-based data model. While the underlying principles of UTM parameters remain the same, their interpretation and analysis within GA4’s interface have evolved. GA4 focuses on understanding the entire user journey, and well-structured UTMs are critical to mapping this journey accurately.
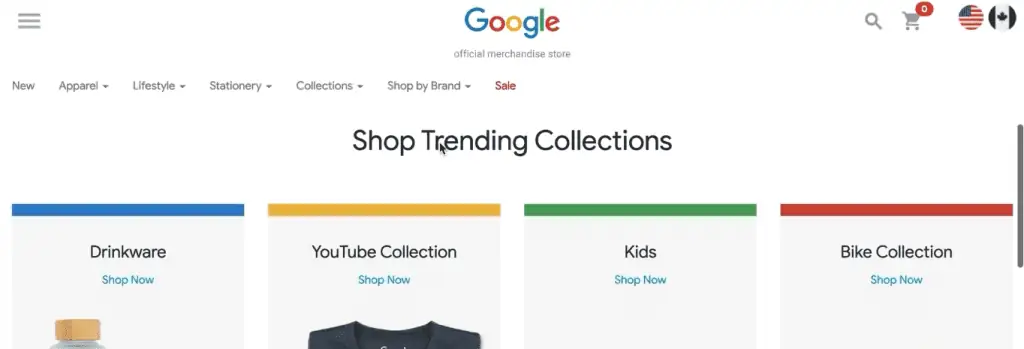
For our exploration, we’ll use a hypothetical Google Merchandise Store as our case study. Imagine this store sends out a newsletter with various promotional links, all meticulously tagged with UTM parameters.
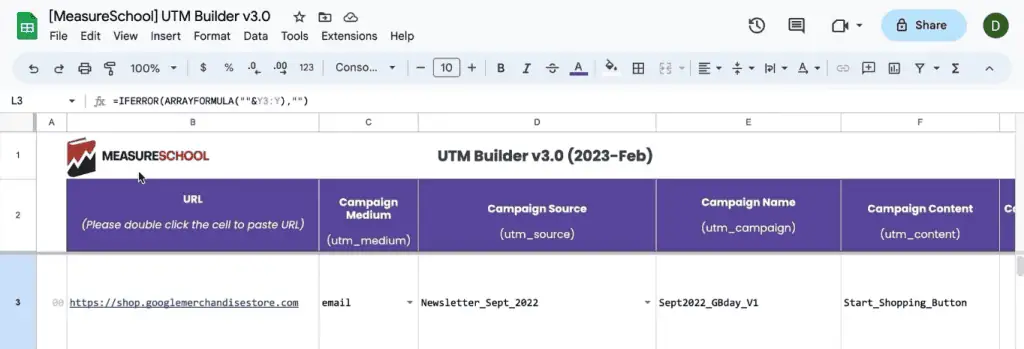
The process of attaching UTM codes to your URLs can be streamlined using various tools. Google provides its official Campaign URL Builder, a straightforward web interface. Alternatively, many marketing teams opt for custom solutions, such as a UTM Builder Sheet that automates URL generation based on input fields.

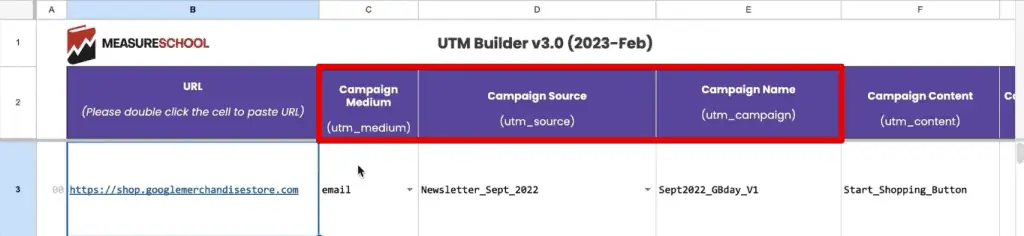
When creating a UTM-appended URL, it’s generally recommended to always include the three core parameters: utm_source, utm_medium, and utm_campaign. These are fundamental for basic traffic attribution.
Required UTM Parameters:
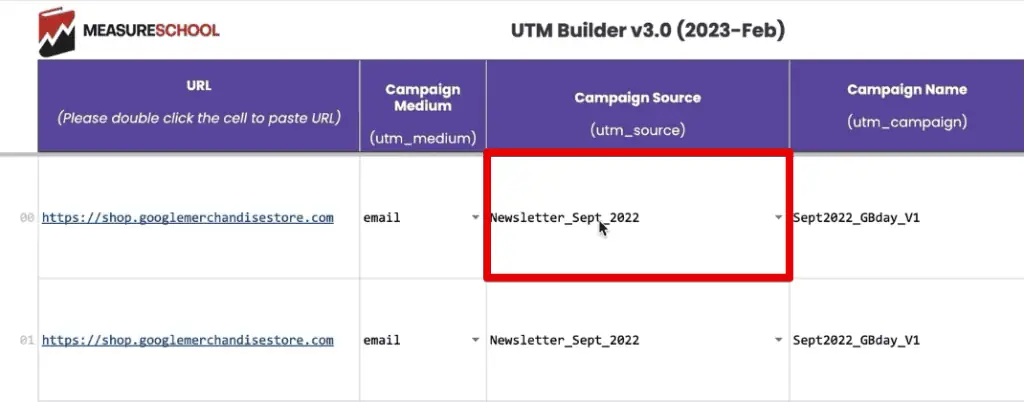
utm_source: e.g.,newsletterutm_medium: e.g.,emailutm_campaign: e.g.,september_promo
Optional UTM Parameters:
utm_content: e.g.,hero_bannerorstart_shopping_buttonutm_term: e.g.,buy+google+merchutm_id: e.g.,promo_id_123utm_source_platform: e.g.,mailchimp
It’s worth noting that while utm_creative_format and utm_marketing_tactic are part of the broader UTM specification, they are currently not natively reported as dimensions in GA4 properties. For comprehensive details on GA4’s UTM parameters, refer to Google’s official documentation on GA4 URL builders.
Once these parameters are appended, the full URL might look like this:
https://shop.googlemerch.com/new-arrivals?utm_source=newsletter&utm_medium=email&utm_campaign=september_promo&utm_content=start_shopping_button
When a user clicks this link in the newsletter, they are redirected to the website. GA4’s tracking code on the landing page then reads these key-value pairs from the URL and stores them, allowing you to accurately identify where that user originated from within your analytics account.
Navigating GA4: Unveiling Your UTM Data
Now that we understand what UTMs are and how they are created, the next crucial step is to view and interpret them within your GA4 account. GA4 offers both standard reports and highly customizable exploration reports for this purpose.
Method 1: Standard Traffic Acquisition Reports
The quickest way to get an overview of your UTM data is through GA4’s standard acquisition reports.
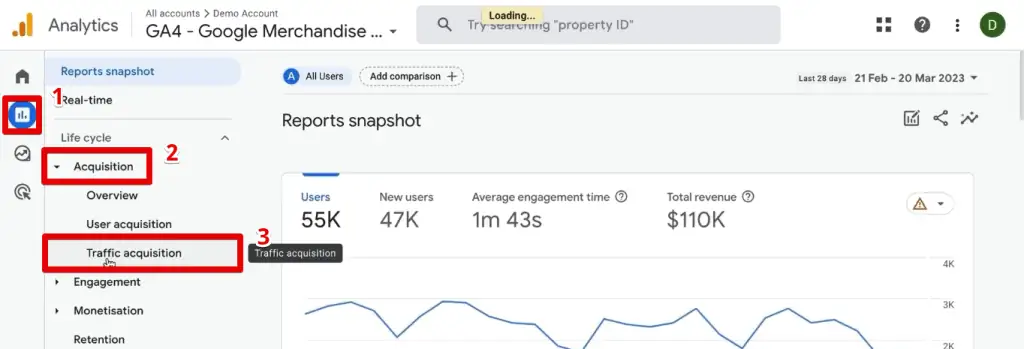
- Navigate to Reports: In your GA4 interface, go to Reports on the left-hand navigation bar.
- Access Acquisition Reports: Under "Life cycle," click on Acquisition, then select Traffic acquisition. This report provides insights into how users arrived at your website.
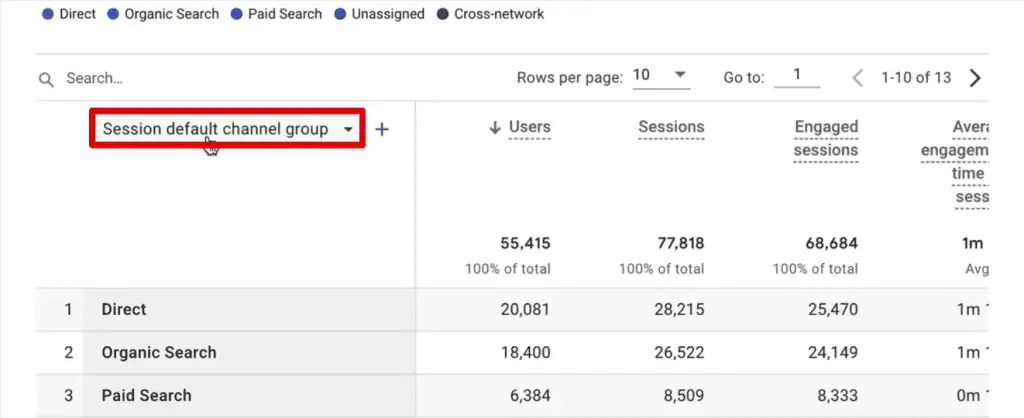
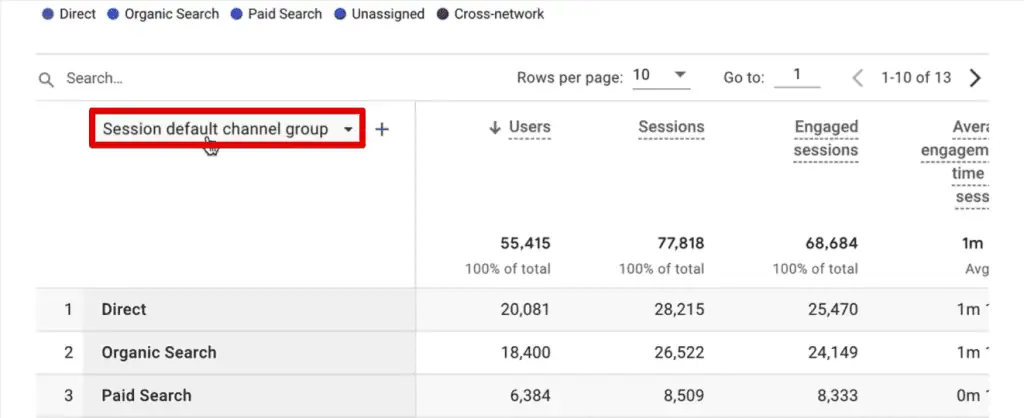
Initially, the primary dimension of the table in this report is usually the "Session default channel grouping." This groups traffic into broad categories like "Organic Search," "Paid Search," "Direct," etc. While useful for high-level overview, it doesn’t show your specific UTM values.
- Change Primary Dimension: To see your UTM data, click on the dropdown menu labeled Session default channel group.
- Select Session Source/Medium: From the list, choose Session source/medium. This dimension combines the values from your
utm_sourceandutm_mediumparameters, providing a more detailed view.
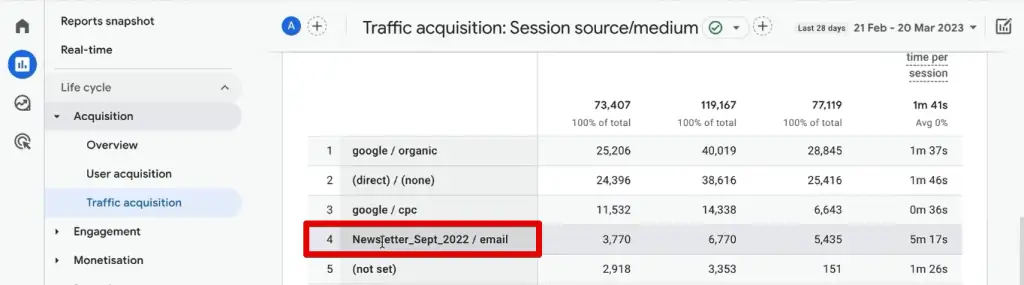
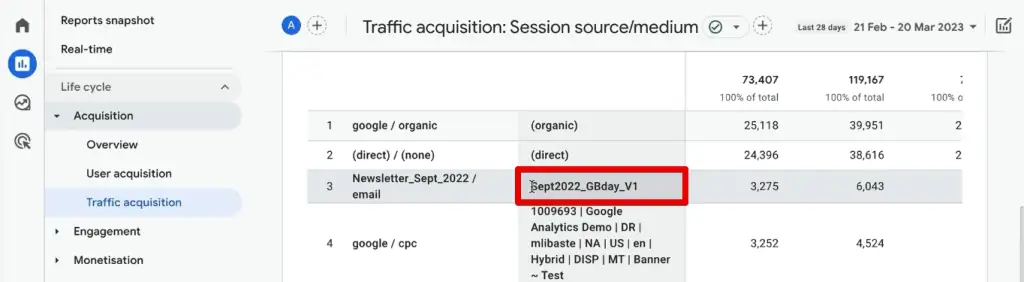
Let’s say we want to find the traffic from our "Newsletter_Sept_2022" source, which uses an "email" medium.

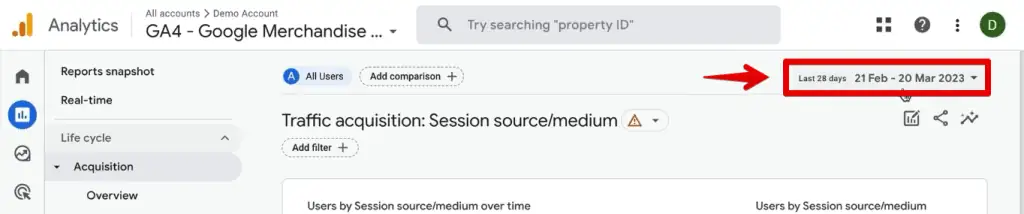
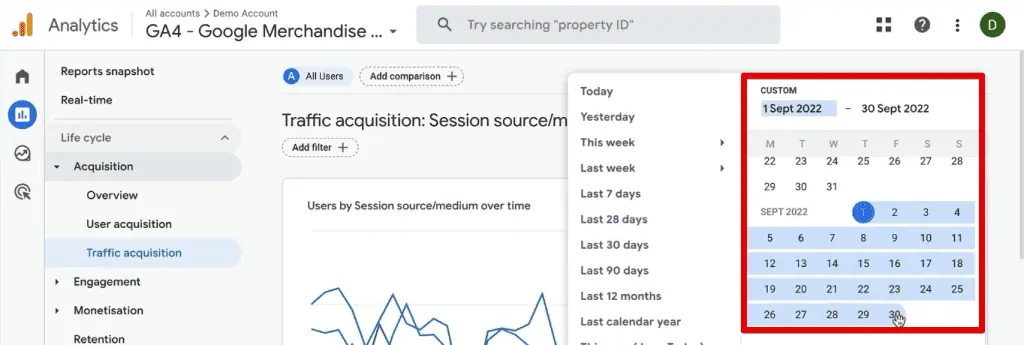
- Adjust Date Range: Click the date range selector in the top-right corner of the report. Set the start and end dates to cover the full month of September 2022. Click "Apply."
Upon refreshing, you should now see an entry for Newsletter_Sept_2022 / email in your table, alongside other traffic sources. This immediately gives you an overview of sessions and other metrics attributed to this specific UTM combination.
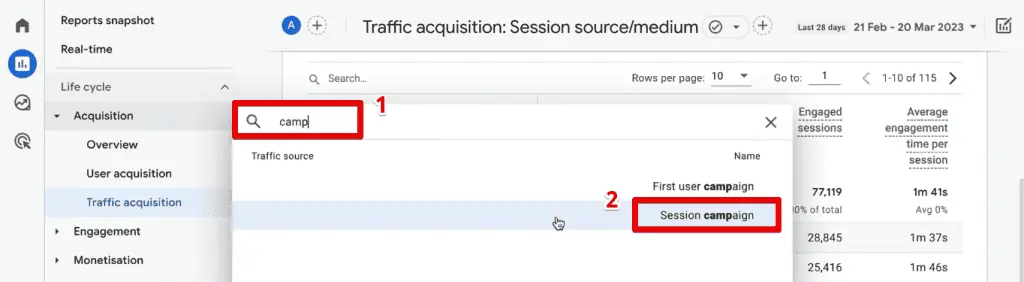
- Add a Secondary Dimension (Optional): To drill down further, you can add a secondary dimension. Click the + icon next to "Session source / medium."
- Search and Select Campaign: Type "campaign" in the search bar, then select Session campaign.
After a few moments, the table will update to include the utm_campaign value (e.g., september_promo) associated with your newsletter source.
Limitations: While convenient for quick checks, the standard traffic acquisition report has limitations. It can typically display only up to two dimensions simultaneously, making deeper, multi-parameter analysis cumbersome. For more complex investigations, GA4’s Exploration Reports are the preferred tool.
How to Track UTM Parameters
For comprehensive tracking, ensure every external link pointing to your website is consistently tagged. Once implemented, tracking UTM parameters is straightforward using GA4’s built-in reports. The "Session source/medium" reports, as demonstrated, are your primary destination. For a more detailed, step-by-step guide on the initial setup and basic tracking, refer to our dedicated resource: How to Track UTM Codes in Google Analytics 4.
Method 2: Deep Dive with Exploration Reports
For granular control, multi-dimensional analysis, and the ability to save custom reports, GA4’s Exploration Reports are indispensable. They provide a flexible canvas to construct reports tailored precisely to your analytical needs, far surpassing the capabilities of standard reports.
-
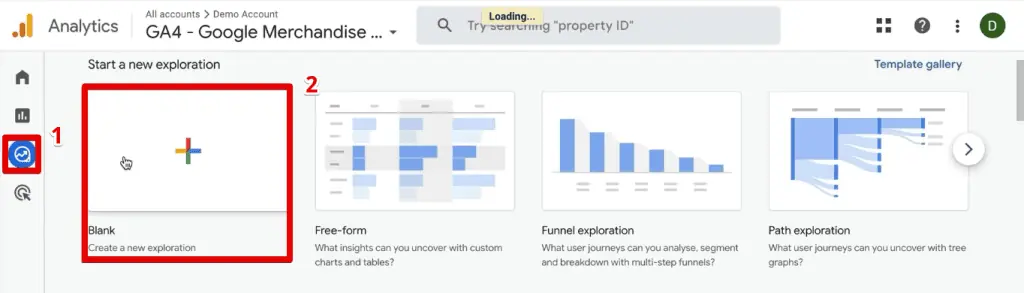
Access Exploration Reports: In your GA4 interface, go to Explore on the left-hand navigation bar.
-
Start a Blank Report: Choose the Blank template to create a fully customizable report.
-
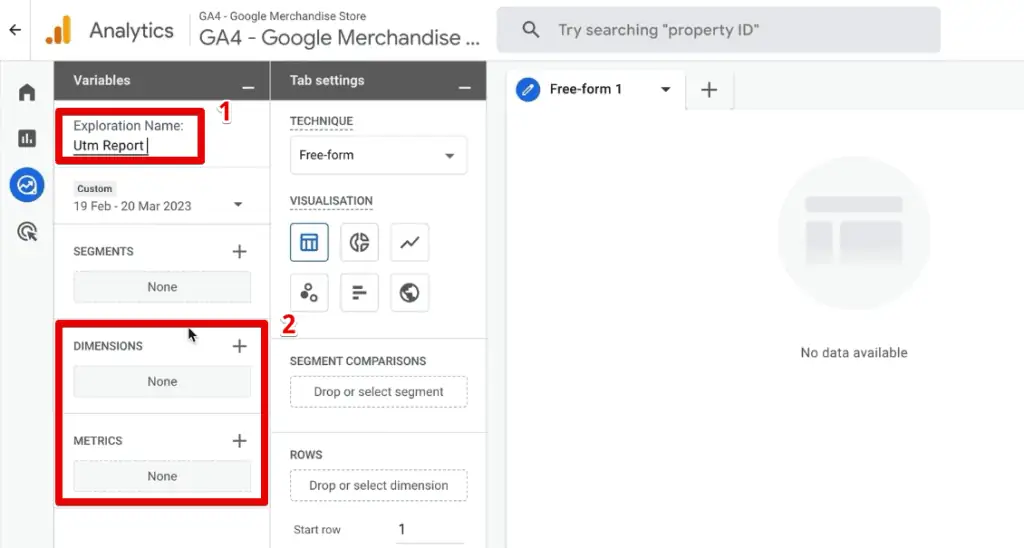
Name Your Report: Give your exploration a descriptive name, such as "UTM Campaign Performance – September 2022."
-
Define Dimensions and Metrics: On the left pane, locate the "Dimensions" and "Metrics" sections. This is where you’ll import the data points you want to analyze.
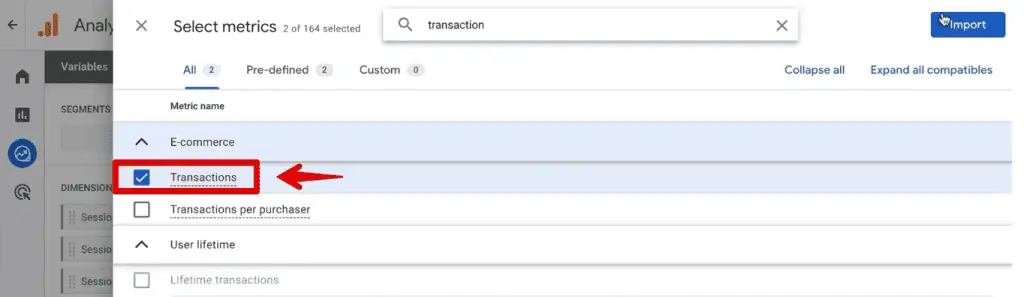
- Metrics First (e.g., Sessions): Click the + icon next to "Metrics." Search for "sessions" and select Sessions. Click Import. You might also want to add Transactions or Conversions if you’re tracking sales or specific actions.
-
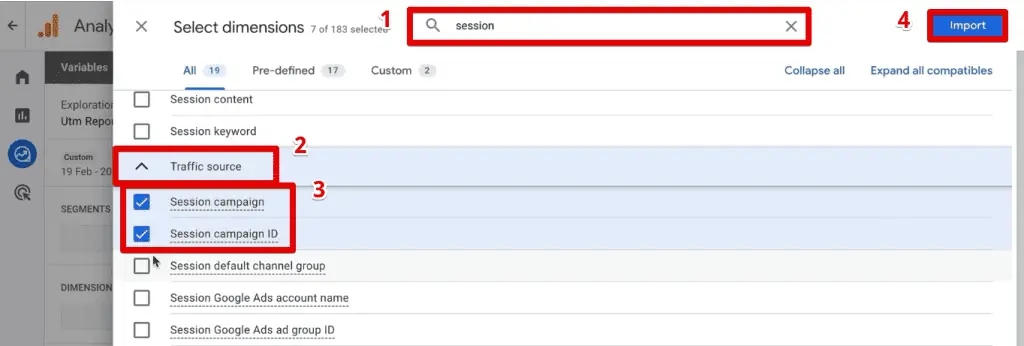
Dimensions (UTM Parameters): Click the + icon next to "Dimensions." GA4’s naming convention for UTM dimensions can be tricky. Here’s a helpful mapping:

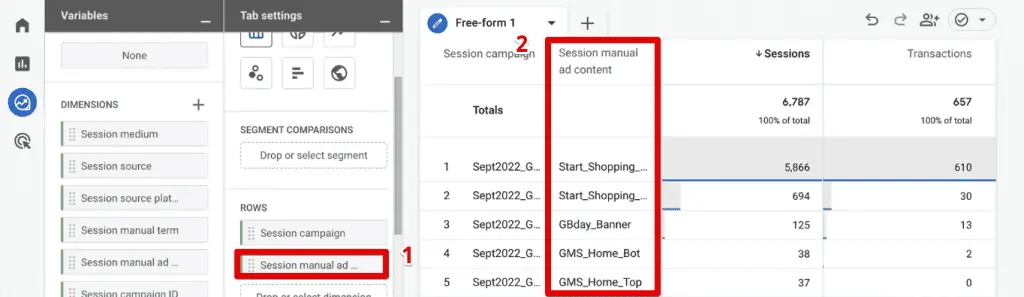
UTM Parameter GA4 Dimension utm_idSession campaign ID utm_sourceSession source utm_mediumSession medium utm_campaignSession campaign utm_source_platformSession source platform utm_termSession manual term utm_contentSession manual ad content You can generally find all UTM-related dimensions under the "Traffic Source" category. Select Session source, Session medium, Session campaign, Session manual ad content, and Session manual term. Click Import.
-
Build Your Report Table:
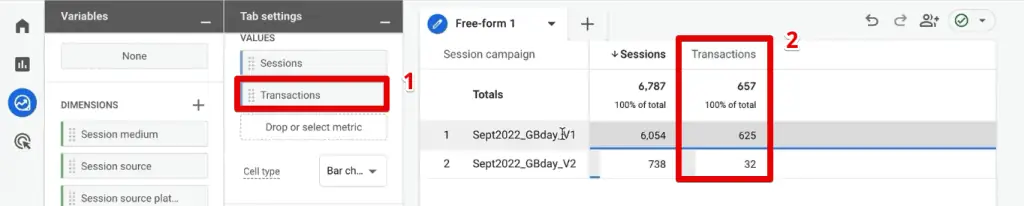
- Add Metrics to Values: Drag and drop Sessions (and any other desired metrics like Transactions) from the "Metrics" list into the "Values" section under "Tab Settings."
- Add Dimensions to Rows: Drag and drop Session medium into the "Rows" section. This will populate the table on the right with your various mediums and their corresponding session counts.
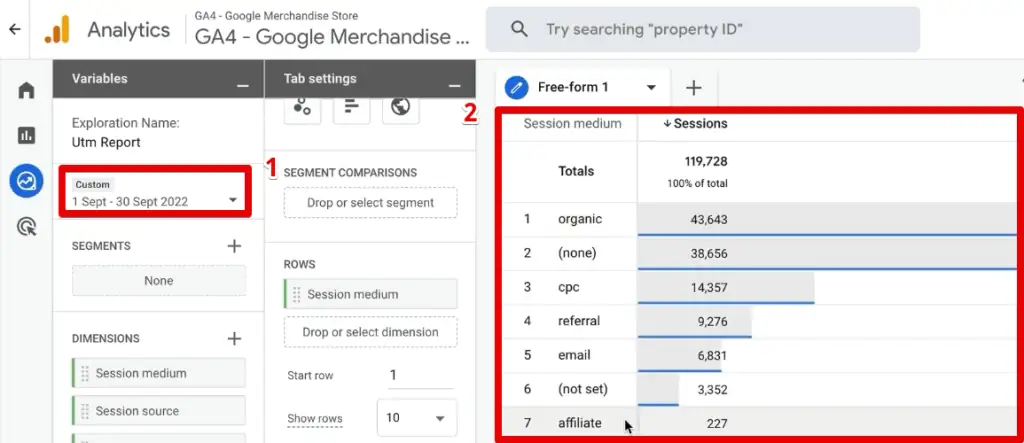
- Refine Date Range: Just like in standard reports, adjust the date range (e.g., September 1-30, 2022) to focus on your target period.
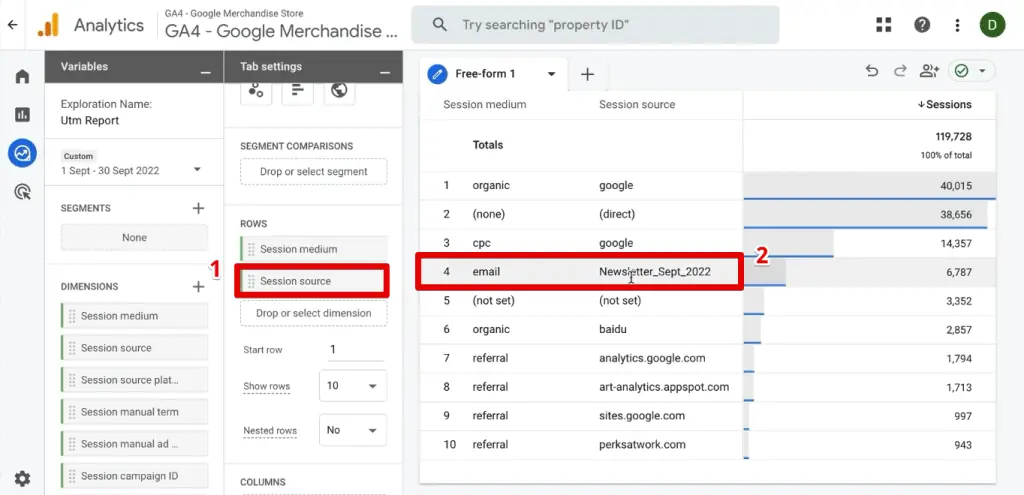
- Add Session Source: Drag Session source into the "Rows" section, placing it below "Session medium." Now you’ll see combinations like
email / Newsletter_Sept_2022.
Efficient Filtering Techniques
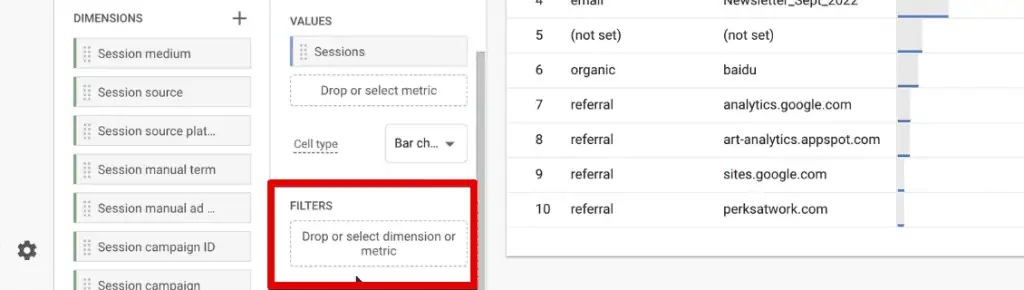
For highly focused analysis, filters are essential. Instead of manually configuring filters in the "Filters" section, GA4 offers a quicker way:
-
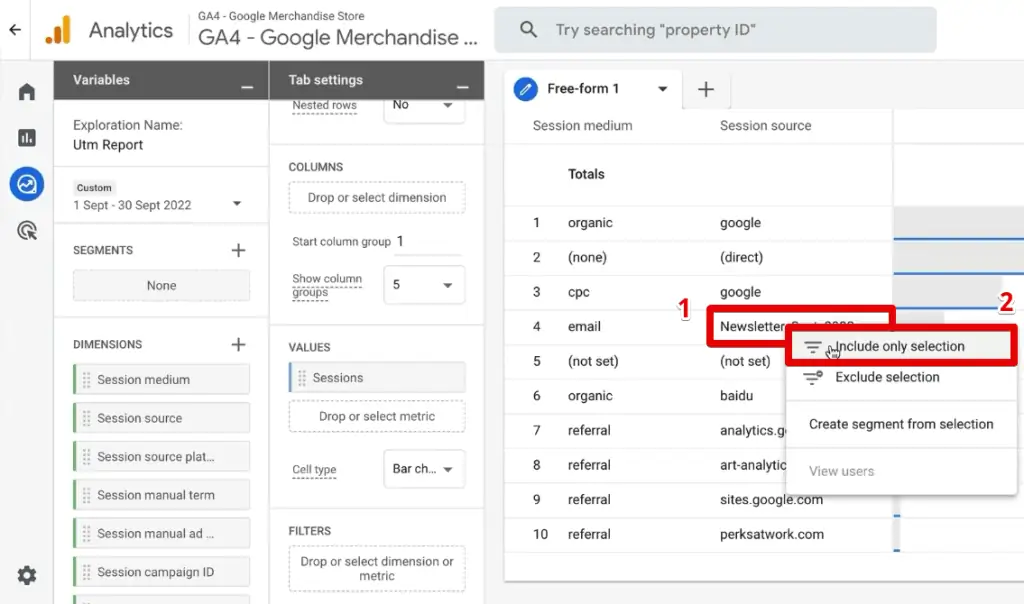
Quick Filter by Selection: Locate the
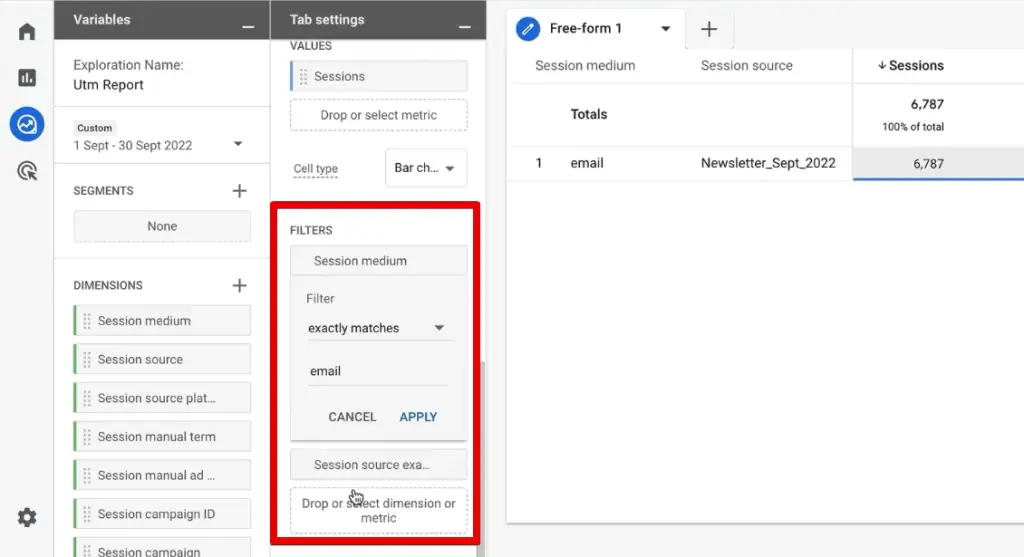
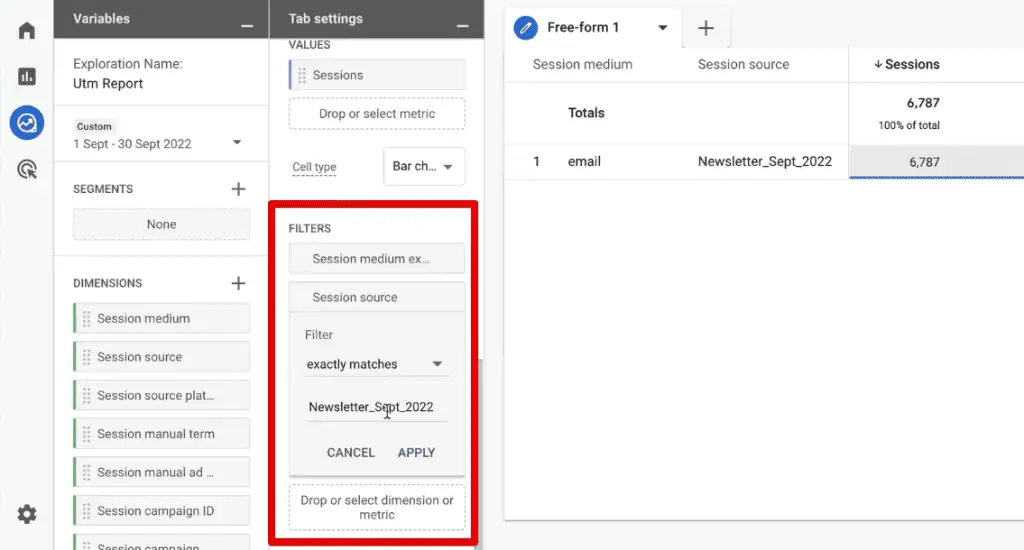
email / Newsletter_Sept_2022row in your report table. Right-click on it and select Include Only Selection. This automatically applies two filters in the "Filters" section:Session medium exactly matches emailandSession source exactly matches Newsletter_Sept_2022. Your report will now only show data for this specific newsletter.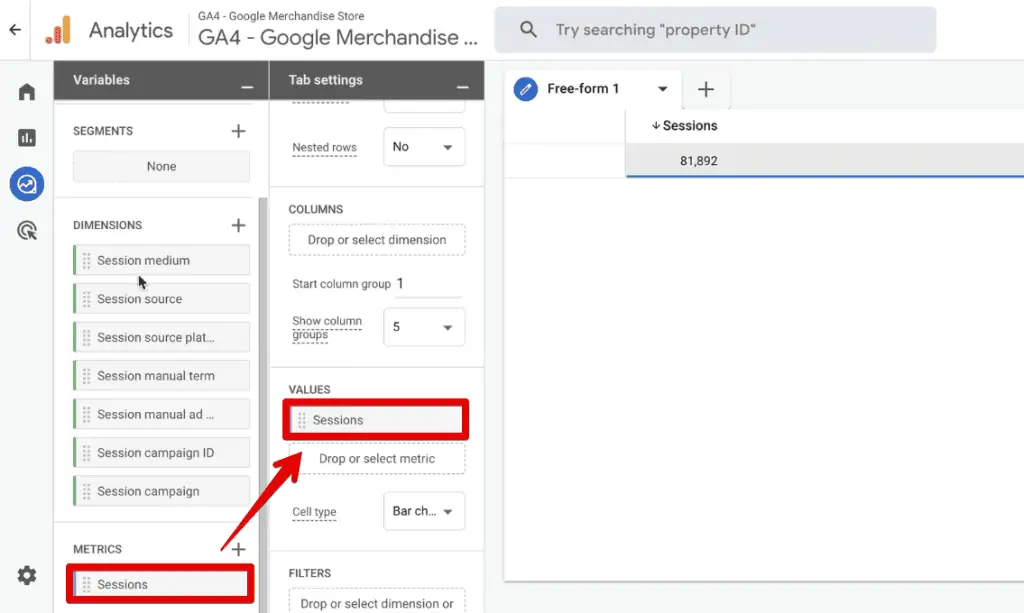
-
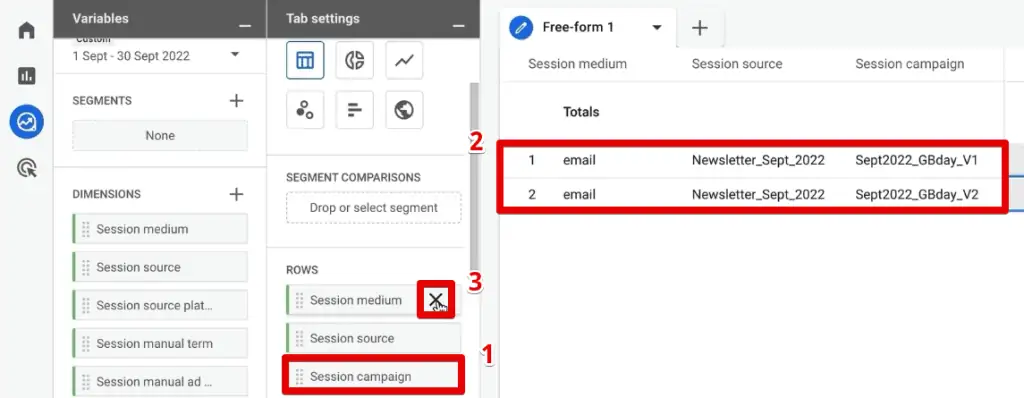
Analyze Campaign and Content: Once filtered, you can remove the "Session medium" and "Session source" dimensions from the "Rows" section (by clicking the "–" icon next to them) and add Session campaign and Session manual ad content.
In our Google Merchandise Store example, you might see campaigns like
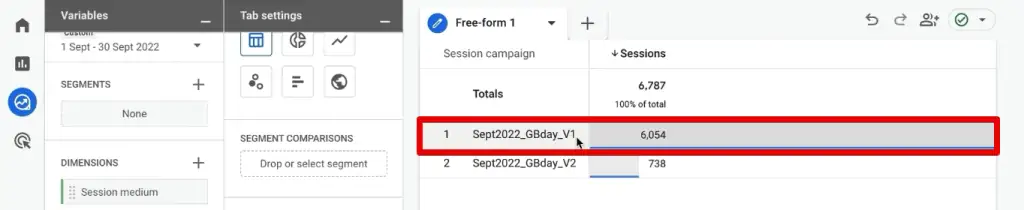
Birthday_CampaignandNewsletter_Version_1,Newsletter_Version_2. Forutm_content, you might findstart_shopping_buttonandbirthday_banner. This immediately reveals insights, such asNewsletter_Version_1generating significantly more sessions and transactions thanNewsletter_Version_2for the "start shopping button" content.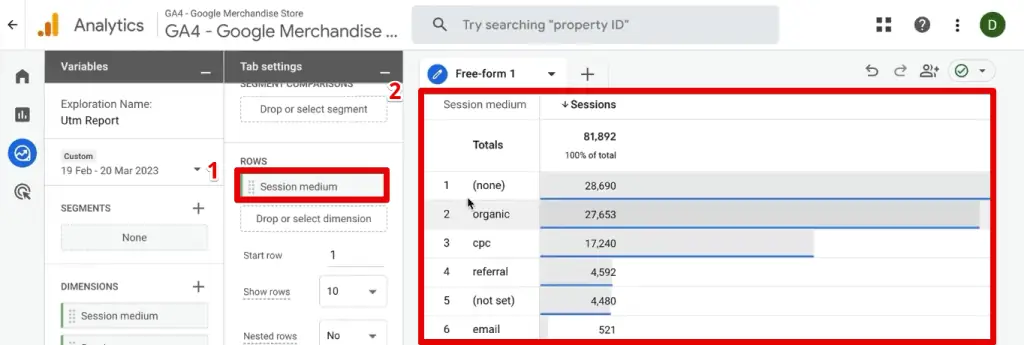
Advanced Analytics: Segments and Audiences
Exploration Reports truly shine when leveraging segments. Segments allow you to isolate subsets of your data based on specific criteria (e.g., users from a particular campaign, users who performed a certain action) and compare their behavior.
Comparing Different Campaign Versions Through Segments
Let’s assume you want to compare the performance of Newsletter_Version_1 versus Newsletter_Version_2 for the start_shopping_button content, over time, or against other traffic.
- Create a Segment from Selection: In your filtered exploration report (showing data for
Newsletter_Sept_2022andstart_shopping_button), right-click on theNewsletter_Version_1row under "Session campaign." Select Create Segment from Selection. - Name and Save Segment: A new segment builder window will appear, pre-populated with your current filters (source, medium, content, and campaign). Name this segment descriptively (e.g., "Newsletter V1 – Start Button") and click Save.
- Repeat for Comparison: Clear your existing filters. Then, create a similar segment for
Newsletter_Version_2 - Start Button. - Compare Segments: Remove all dimensions from the "Rows" section. Now, in the "Segment Comparisons" section on the left, drag and drop your newly created segments ("Newsletter V1 – Start Button" and "Newsletter V2 – Start Button") into the comparison slots.
- Add Dimensions for Comparison: Add a relevant dimension to the "Rows" section, such as Session medium (if you want to see the medium breakdown within each segment) or Date to see performance trends.
This side-by-side comparison allows you to clearly see which version generated more sessions, transactions, or other key metrics, providing actionable intelligence for future campaign planning.
Leveraging Segments for Audience Building and Retargeting
A powerful feature of segments in GA4 is the ability to transform them into audiences. If a segment (e.g., "Users from Birthday Campaign who completed a purchase") identifies a valuable group, you can save it as an audience directly from the segment builder. This audience can then be exported to Google Ads for targeted remarketing campaigns, allowing you to re-engage users who showed specific interest or behavior.
Extending UTM Functionality Beyond GA4
For organizations with advanced tracking needs, particularly those integrating analytics with Customer Relationship Management (CRM) systems, advanced UTM strategies are crucial.
Custom UTM Parameters via Google Tag Manager
Sometimes, the standard UTM parameters aren’t sufficient for capturing all the nuances of your campaigns. GA4 allows for custom UTM parameters by configuring them as custom dimensions. This typically involves using Google Tag Manager (GTM).
The process generally entails:
- Capturing the Custom Parameter: Using GTM, create a custom URL variable that extracts the value of your custom UTM parameter (e.g.,
utm_audience_segment). - Sending to GA4: Configure your GA4 event tag in GTM to include this custom variable as an event parameter.
- Registering in GA4: In GA4’s Admin section, register this event parameter as a custom dimension.
This ensures that GA4 recognizes and reports on your unique parameters whenever they appear in your URLs. For a step-by-step guide, consult resources like How to Create Custom UTM Parameters via Google Tag Manager.
Seamless Integration with CRM Tools
A common challenge is preserving UTM parameters as users navigate through your site and eventually fill out a form or convert, especially when passing this valuable attribution data to your CRM. This is vital for full-funnel lead source tracking.
The solution often involves using cookies to store UTM data. When a user first lands on your website via a UTM-tagged URL, a script captures these parameters and stores them in first-party cookies. When the user later completes a form, these stored UTM values can be dynamically injected into hidden fields within the form. Upon submission, the CRM receives not only the user’s contact information but also the original UTM data, providing a complete picture of the lead’s origin.
This approach ensures that even if users browse multiple pages before converting, the initial attribution data is retained and linked to their profile in your CRM. For detailed implementation, refer to guides like How to Capture UTM Parameters in (Hidden) Form Fields or platform-specific instructions like How to Track Lead Sources in ConvertKit with UTM Codes.
Troubleshooting Common UTM Misattribution Issues
Even with best intentions, UTM implementation can go awry, leading to misattributed traffic that skews your analytics. Recognizing and rectifying these issues is crucial for accurate reporting.
Too Much Direct Traffic
A common symptom of poor or non-existent UTM usage is an unusually high percentage of "Direct" traffic, often accounting for 25-30% or more of your overall sessions. While some direct traffic is natural (users typing your URL directly), excessive amounts indicate that GA4 cannot determine the actual source. This can be caused by:
- Untagged Links: Email campaigns, social posts, or referral links without UTMs will often default to Direct.
- Dark Social: Shares via messaging apps where referrer information is lost.
- Improper Redirects: Redirects that strip UTM parameters.
Fix: Proactively tag all external links. Conduct regular audits of your traffic sources to identify where "Direct" traffic might be masking identifiable origins.
Wrong Source Bucket Attribution
Traffic appearing under an incorrect default channel grouping (e.g., "Organic Social" instead of "Paid Social") is another frequent problem. This occurs when your utm_source and utm_medium values don’t align with GA4’s predefined default channel groupings and their associated regular expressions.
For instance, if you use utm_medium=psoc (for paid social) instead of the standard cpc or paid for social media advertising, GA4 might misclassify it.
Fix: Familiarize yourself with GA4’s default channel grouping rules. Ensure your utm_medium values (and sometimes utm_source values) are consistent with these rules to ensure traffic is categorized correctly. If you need custom groupings, you can define them in GA4’s Admin settings.
Fragmented Traffic
Inconsistent naming conventions are a primary cause of fragmented traffic. For example, if one team member tags a Facebook ad with utm_source=Facebook and another uses utm_source=facebook, GA4 will report these as two separate sources. Similarly, variations like email vs. e-mail or newsletter vs. NewsLetter will lead to disjointed data.
Fix: Implement and strictly enforce a universal UTM naming convention across all marketing teams. Use a centralized UTM builder sheet or tool to automate tagging and ensure consistency (e.g., always lowercase, use hyphens/underscores). Regularly review your GA4 reports for similar-looking sources/mediums that indicate fragmentation and consolidate them if necessary.
Summary
Mastering UTM parameters in Google Analytics 4 is no longer optional; it’s a fundamental skill for any data-driven marketer. This guide has illuminated how to decode and leverage these essential tracking codes to gain deep insights into your website traffic.
We’ve covered the basics of what UTMs are, why they are invaluable for campaign optimization, and where they can be effectively deployed across your marketing channels. Crucially, we’ve provided clear pathways for accessing and analyzing this data within GA4, distinguishing between the quick overview offered by standard traffic acquisition reports and the powerful, customizable analysis available through Exploration Reports. The ability to create segments from your UTM data further empowers you to compare campaign versions, build targeted audiences, and unlock deeper behavioral insights.
Furthermore, we explored advanced strategies for extending UTM functionality, including creating custom parameters via Google Tag Manager and integrating UTM data with CRM systems for comprehensive lead source tracking. Finally, we addressed common troubleshooting scenarios, offering practical advice for combating misattributed traffic and ensuring the integrity of your data.
While GA4 offers robust tools, the power of your analysis ultimately depends on the quality and consistency of your initial UTM tagging. By adhering to best practices and continuously refining your approach, you can transform raw traffic numbers into actionable intelligence that drives smarter marketing decisions. Whether you’re a beginner or looking to refine your existing strategy, effective UTM management is the key to unlocking the true story behind your website’s performance.
If you’re new to GA4 UTM tracking, remember to revisit our foundational guide on How to Track UTM in GA4 for initial setup assistance.
Which UTM parameter do you find most crucial for your analysis? What methods do you primarily use to view your UTM data in GA4? Share your experiences and insights in the comments below!
FAQ
Can I analyze UTM parameters in Google Analytics 4 Exploration Reports?
Yes, absolutely. Google Analytics 4 Exploration Reports are the most powerful and flexible tool within GA4 for analyzing UTM parameters. By starting with a blank exploration report, you can add all relevant UTM parameters (such as Session source, Session medium, Session campaign, Session manual ad content, and
