

Headline: Mastering Traffic Attribution: Unlocking the Full Potential of UTM Parameters in Google Analytics 4 (Updated February 17, 2025)
Main Facts:
In the evolving landscape of digital analytics, accurate traffic attribution remains paramount for marketers. A recent update to best practices, as of February 17, 2025, underscores the critical role of UTM (Urchin Tracking Module) parameters in precisely identifying website traffic sources within Google Analytics 4 (GA4). While the creation of UTM-appended URLs is well-documented, a significant challenge for many professionals has been effectively locating and interpreting this invaluable data within their GA4 accounts. This guide addresses that gap, providing a comprehensive framework for both standard and advanced analysis of UTM parameters in GA4, ensuring marketers can harness granular insights to optimize their campaigns.

A Strategic Roadmap to UTM Analysis in GA4:
The journey to effective UTM parameter analysis in GA4 can be broken down into a logical progression, moving from foundational understanding to sophisticated reporting techniques.
What are UTM Parameters? The Digital Marketer’s Compass
You’ve undoubtedly encountered them: those seemingly random strings of text appended to a URL, often following a question mark. These are UTM parameters – small, descriptive tags added to URLs to provide Google Analytics with more context about incoming traffic. Originating from Urchin Software Corporation (which Google acquired, leading to Google Analytics), UTMs act as a digital compass, guiding analysts to understand not just that traffic arrived, but how, from where, and why.
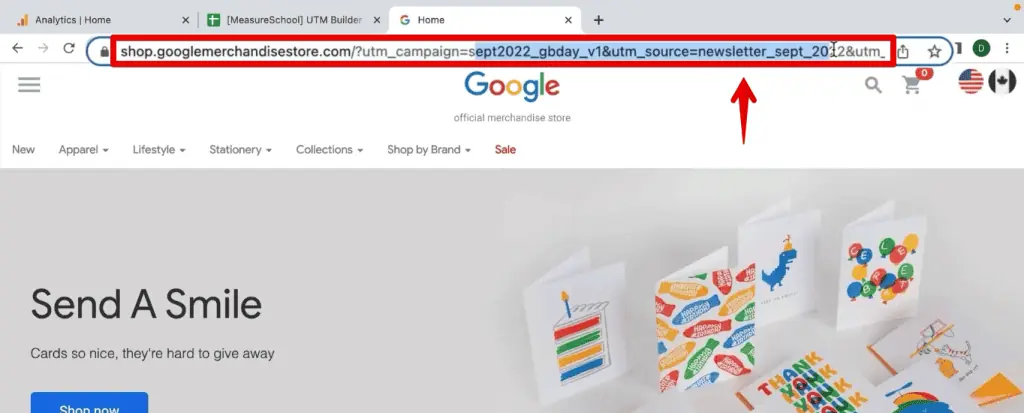
For instance, a URL might look like this: https://example.com/product?utm_source=newsletter&utm_medium=email&utm_campaign=spring_sale&utm_content=hero_banner. Each utm_ tag provides a specific piece of information. They are not recommended for internal linking but are indispensable for external links directing users to your site. By systematically applying these codes, marketers gain clarity on the "who," "how," and "what" driving user engagement.

Why UTMs are Indispensable for Modern Marketing Attribution
The true power of UTM parameters lies in their ability to demystify campaign performance and provide actionable insights. Consider a scenario: a marketing team launches a multi-channel campaign across Facebook, LinkedIn, and Google Ads, all promoting a new product on a specific landing page. Without UTMs, Google Analytics might simply report 1,000 visitors and 100 purchases to that page. The crucial question of which channel drove the most effective traffic remains unanswered.
With properly implemented UTM codes, the narrative dramatically changes. You could discern that:
- Facebook (via
utm_source=facebook&utm_medium=social_paid) generated 500 visitors, leading to 60 purchases. - LinkedIn (via
utm_source=linkedin&utm_medium=social_paid) brought 300 visitors, resulting in 25 purchases. - Google Ads (via
utm_source=google&utm_medium=cpc) delivered 200 visitors, yielding 15 purchases.
This granular breakdown allows marketers to:

- Optimize Budget Allocation: Shift spending towards high-performing channels.
- Refine Messaging: Understand which campaign messages resonate most.
- Improve ROI: Maximize return on investment by focusing on what works.
- Understand User Intent: Gain deeper insights into the specific actions (e.g., clicking a "Learn More" button vs. a "Shop Now" button) that led to conversion.
Where and How UTMs Are Deployed Across the Digital Sphere
UTM parameters are versatile and can be applied virtually anywhere a link directs users to your website. Their common applications span a wide array of digital marketing activities:

- Email Marketing Campaigns: Track specific newsletters, promotions, or abandoned cart reminders.
- Social Media Posts (Organic & Paid): Differentiate between organic reach and paid advertisements on platforms like Facebook, Instagram, LinkedIn, and X (Twitter).
- Paid Search Advertisements (Non-Google Ads Auto-Tagging): While Google Ads often auto-tags, manual UTMs are vital for other PPC platforms.
- Display and Banner Advertising: Measure the effectiveness of different ad creatives and placements.
- Affiliate Marketing: Attribute traffic and conversions to specific affiliate partners.
- Guest Posts and External Content: Understand the referral power of external publications.
- Offline Marketing with QR Codes: Bridge the gap between physical and digital by embedding UTMs in QR code URLs.
Essentially, any link you control that points to your website is an opportunity for UTM tagging, transforming a generic click into a rich data point.
Best Practices for Robust UTM Tagging
Effective UTM implementation requires discipline and a standardized approach. Neglecting best practices can lead to fragmented or misattributed data, undermining the very purpose of UTMs.
- Consistency is Key: Develop and adhere to a strict naming convention (e.g., always lowercase, use underscores for spaces).
utm_source=Facebookandutm_source=facebookwill be treated as two distinct sources in GA4. - Required Parameters: Always use
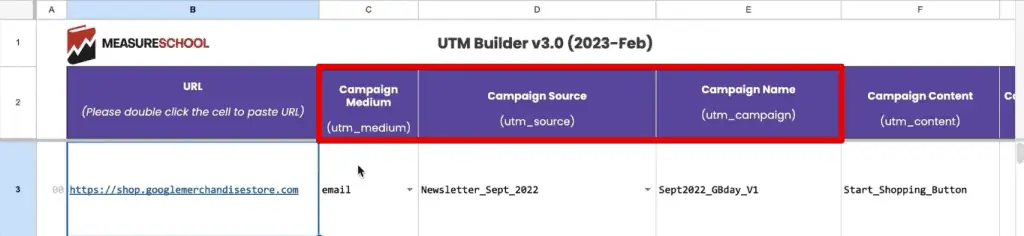
utm_source,utm_medium, andutm_campaign. These provide the fundamental attribution layers. - Descriptive Naming: Ensure your parameter values are clear and informative (e.g.,
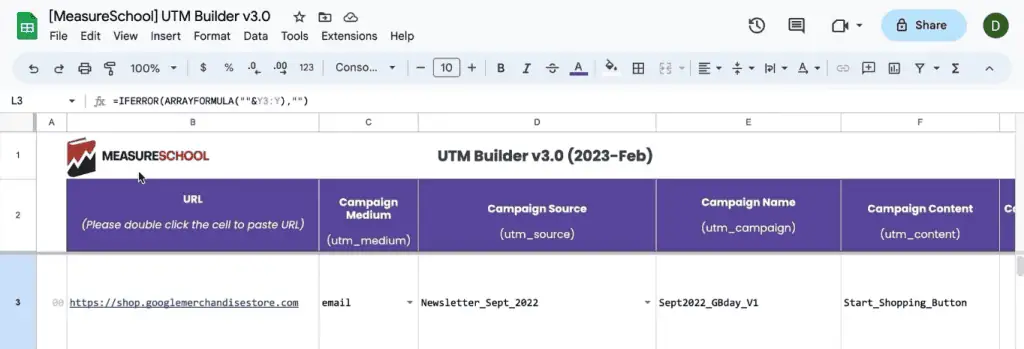
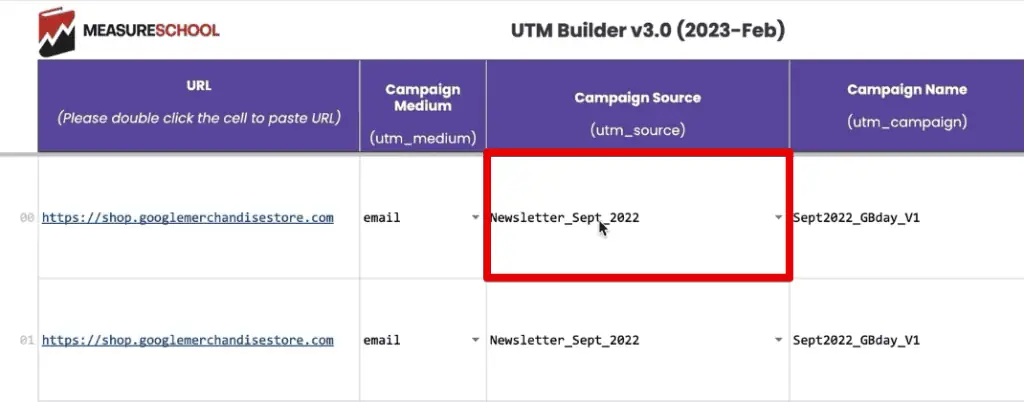
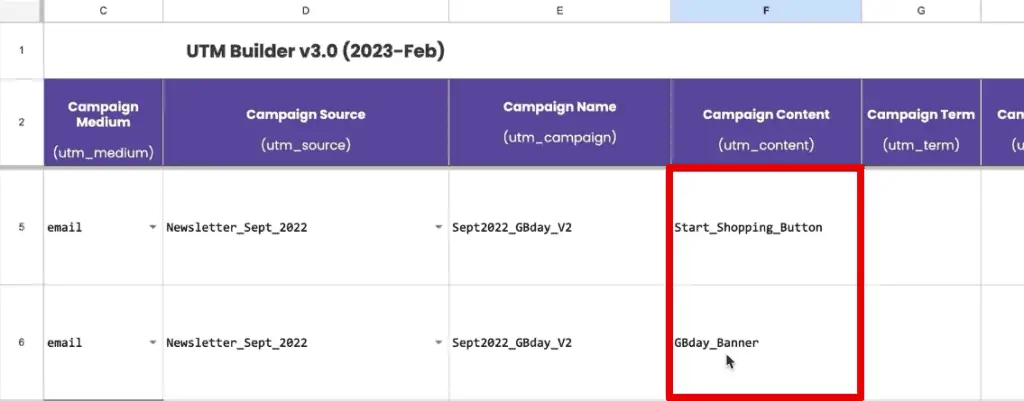
utm_campaign=holiday_sale_2025notutm_campaign=promo). - Use URL Builders: Leverage tools like Google’s Campaign URL Builder or dedicated UTM builder sheets (like the MeasureSchool UTM Builder Sheet referenced in the original article) to ensure correct syntax and minimize errors.
- Avoid Internal Linking: Never use UTMs for internal links on your website, as this can overwrite original source data.
- Case Sensitivity: GA4 is case-sensitive, so maintain consistent casing (e.g.,
emailvs.Email). - Document Your Strategy: Maintain a centralized spreadsheet or database of all your UTM parameters to ensure consistency across teams and campaigns.
Navigating UTM Data in Google Analytics 4: The Essentials
Once UTM parameters are correctly appended to your URLs, the next crucial step is to retrieve and analyze this data within GA4. Unlike its predecessor, Universal Analytics, GA4 offers both standard reports and highly customizable exploration reports for this purpose.
1. Standard Reports: Quick Insights into Traffic Acquisition
For a rapid overview of your UTM data, GA4’s standard reports provide a convenient starting point.

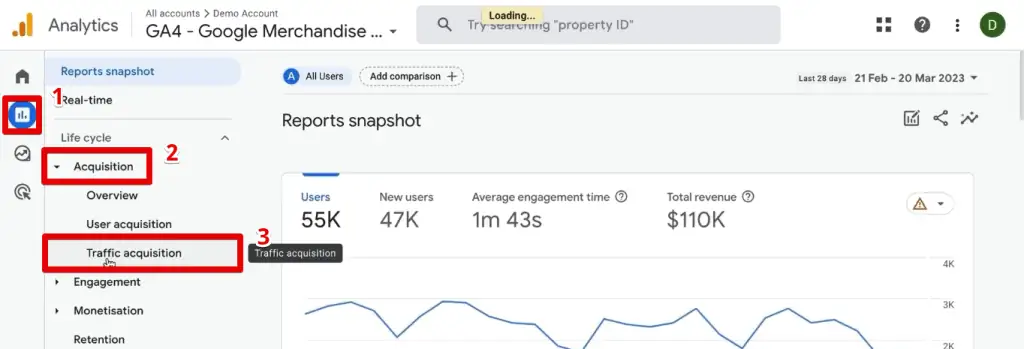
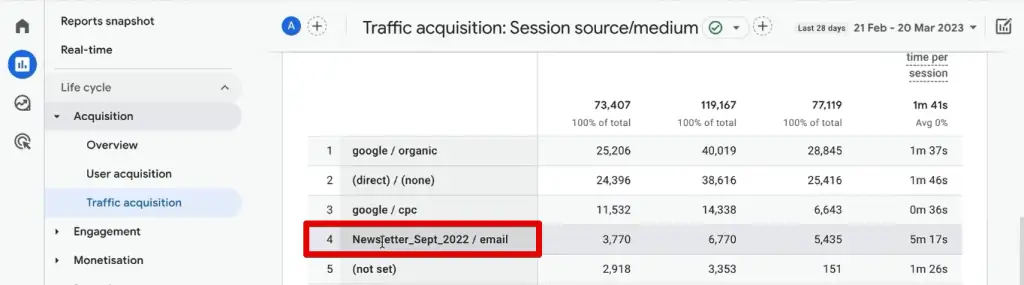
- Accessing the Report: Navigate to
Reports>Acquisition>Traffic Acquisition. This report is designed to show how users arrive at your website. - Changing the Primary Dimension: By default, the table often displays the "Session default channel group." To view your custom UTMs, click on this dimension header and select
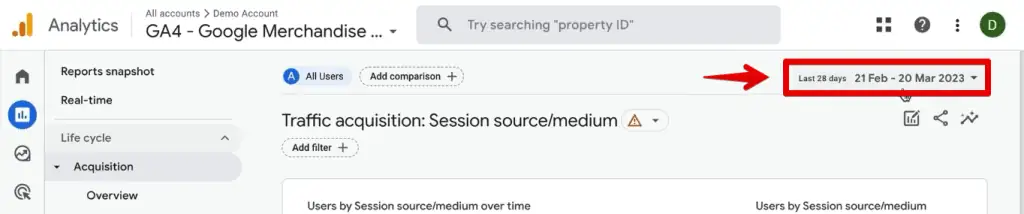
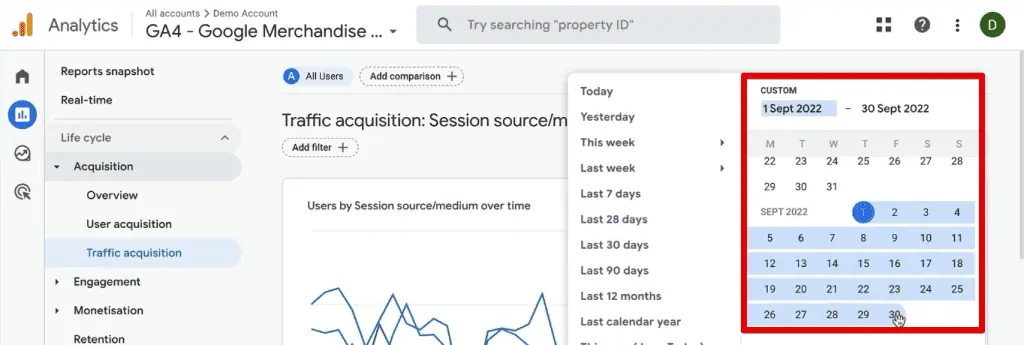
Session source / medium. This combines theutm_sourceandutm_mediumvalues, offering a concise view of your traffic origins. - Applying Date Ranges: To focus on a specific campaign period, adjust the date range in the top-right corner. For example, to analyze a "Newsletter_Sept_2022" campaign, set the date range to September 2022.
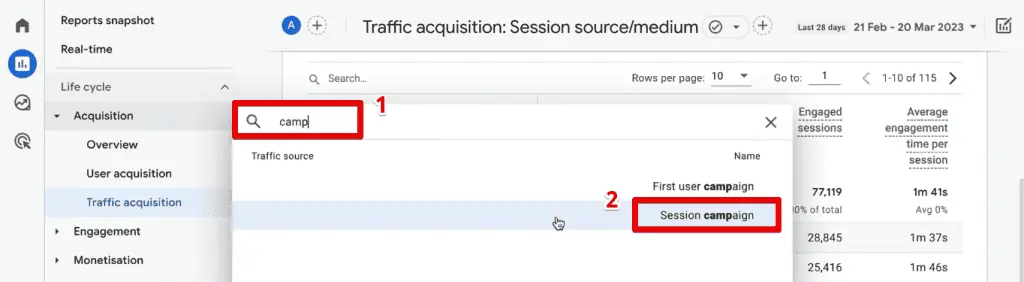
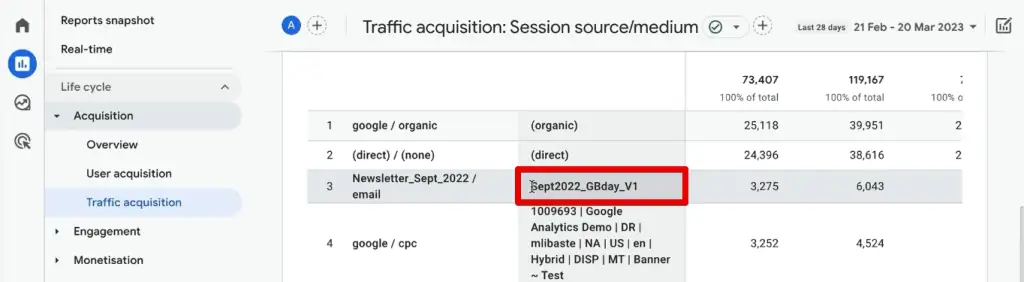
- Adding Secondary Dimensions: To layer in more detail (e.g.,
utm_campaign), click the+icon next to the primary dimension and search for "Session campaign." This allows you to see the campaign name alongside the source/medium.
While standard reports are useful for quick checks and aggregate data, they are limited to displaying only two dimensions at a time. For deeper, multi-dimensional analysis, GA4’s Exploration reports are the preferred tool.
2. The Power of GA4’s Exploration Reports: Unleashing Granular Analysis
For marketers requiring a comprehensive, multi-faceted view of their UTM data, GA4’s Exploration reports are indispensable. These custom reports allow you to combine various dimensions and metrics, apply filters, and build segments tailored to your analytical needs.
-
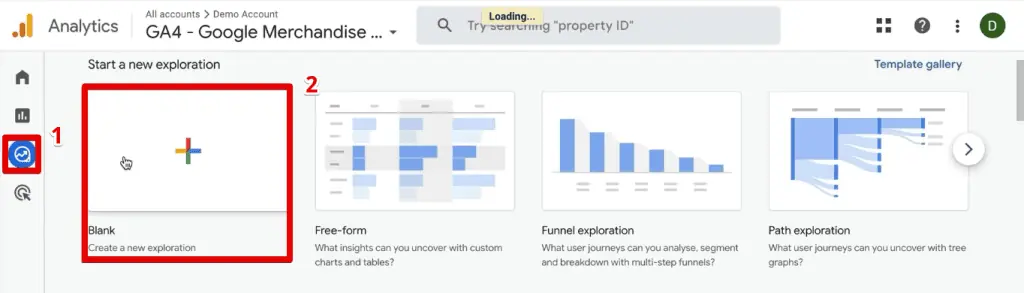
Initiating a Blank Exploration: Start by navigating to
Explore>Blankreport. This provides a clean canvas for your analysis.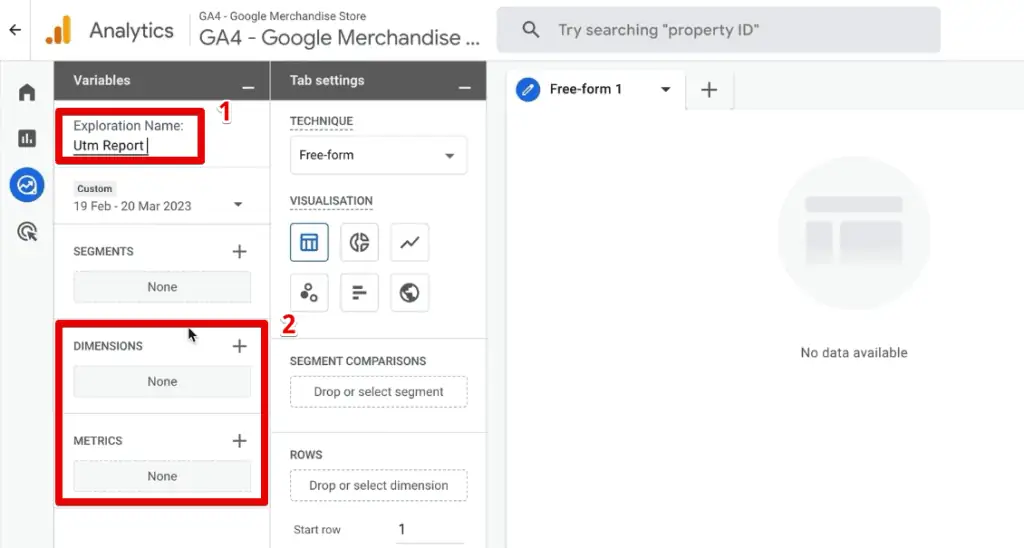
-
Naming Your Report: Assign a clear, descriptive name to your exploration, such as "UTM Campaign Performance."

-
Importing Dimensions and Metrics: The core of any exploration lies in the data you import.
- Metrics: Begin by importing key metrics like
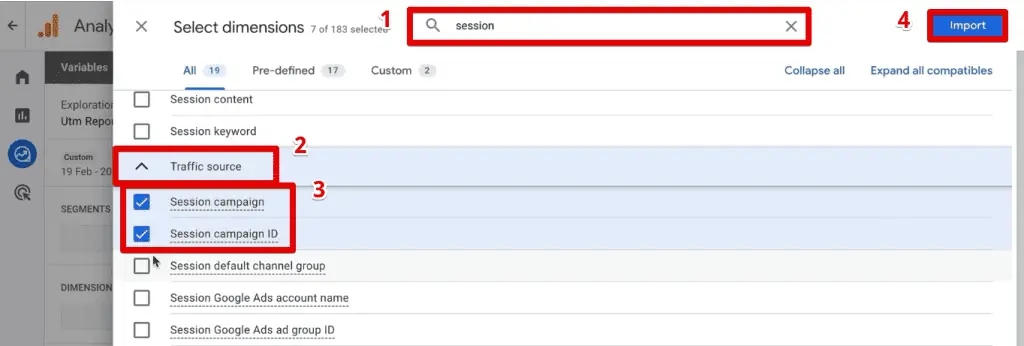
Sessions,Total Users,Engaged Sessions,Conversions, and for eCommerce,TransactionsandPurchase Revenue. - Dimensions: This is where your UTM parameters come into play. GA4 maps UTMs to specific dimensions, often prefixed with "Session."
utm_id->Session campaign IDutm_source->Session sourceutm_medium->Session mediumutm_campaign->Session campaignutm_source_platform->Session source platformutm_term->Session manual termutm_content->Session manual ad content
- Tip: When searching for these, typing "session" usually brings up all relevant UTM-related dimensions under the "Traffic Source" section. Select all the UTM dimensions you want to analyze and click "Import."
- Metrics: Begin by importing key metrics like
-
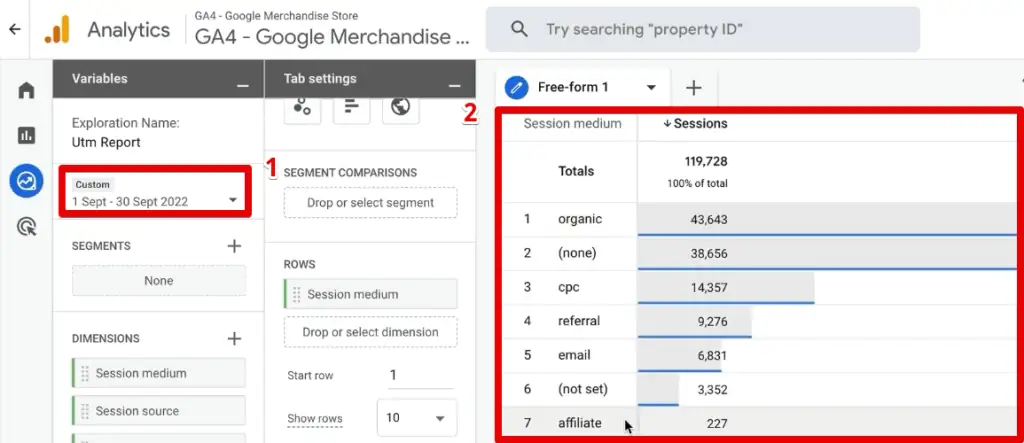
Building Your Report Table:
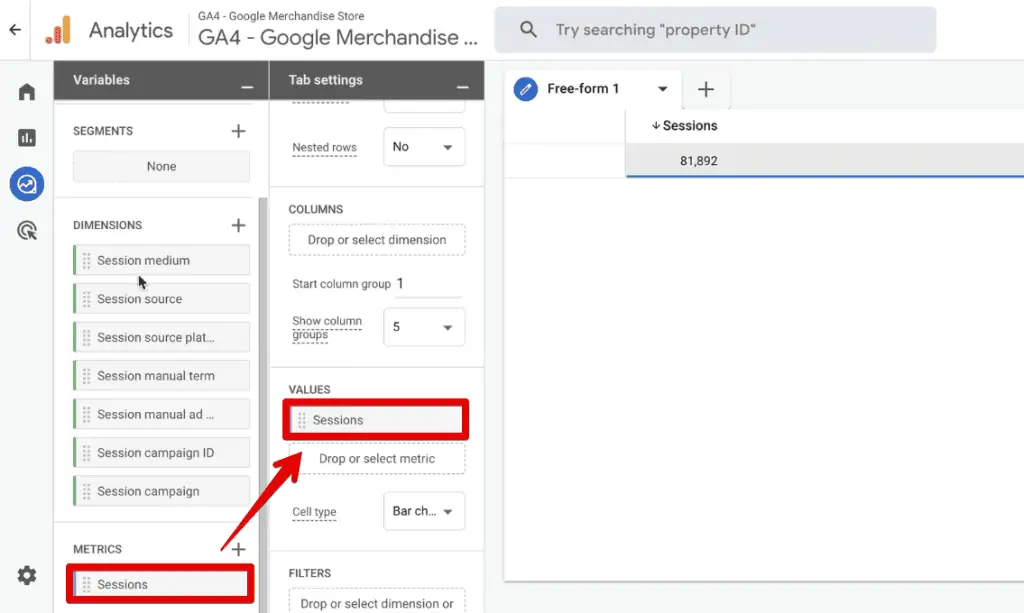
- Values: Drag your chosen metrics (e.g.,
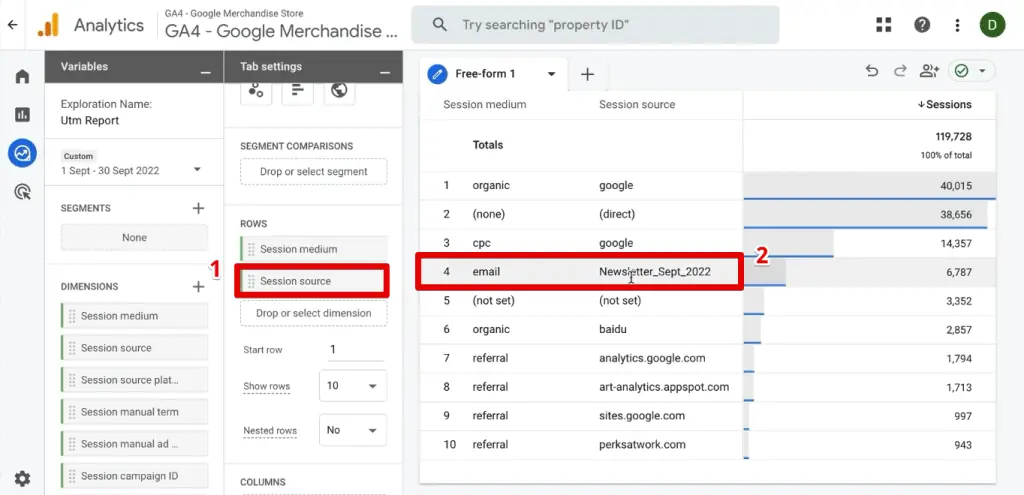
Sessions,Transactions) from the "Metrics" section to the "Values" box under "Tab Settings." - Rows: Drag your primary UTM dimensions (e.g.,
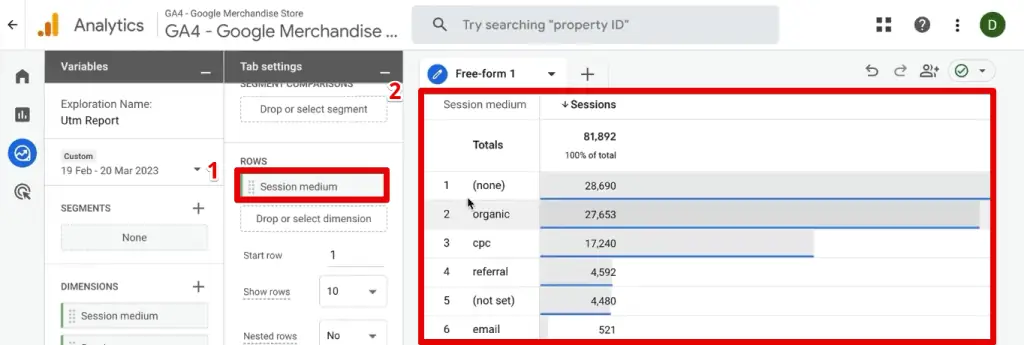
Session medium,Session source) to the "Rows" box. This will populate a data table, showing your imported metrics broken down by these dimensions. - Date Range: Adjust the date range in the top-left to match your analysis period (e.g., September 2022 for a specific newsletter).
- Values: Drag your chosen metrics (e.g.,
-
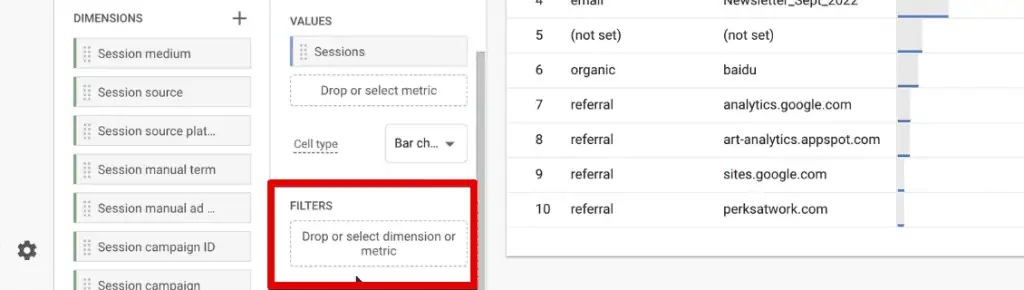
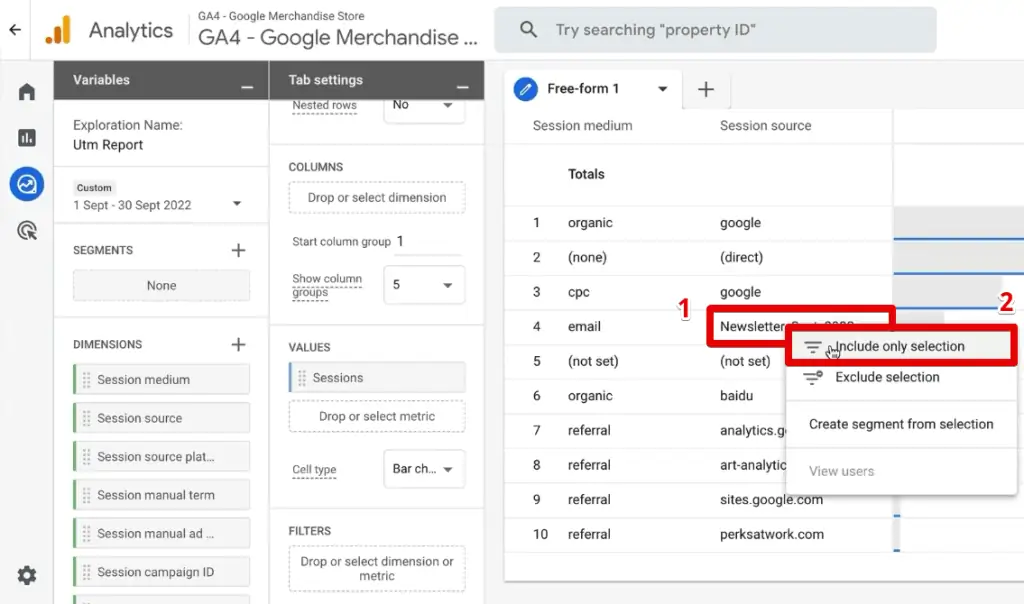
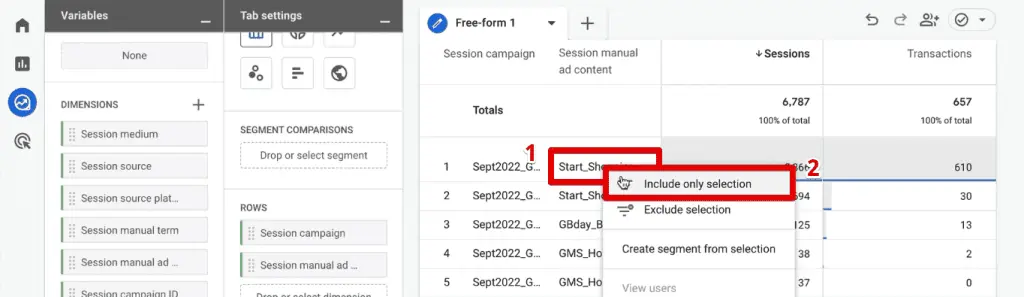
Filtering for Precision: The real power of Exploration reports emerges when you apply filters. Instead of manually configuring complex filter conditions, GA4 offers an intuitive shortcut.
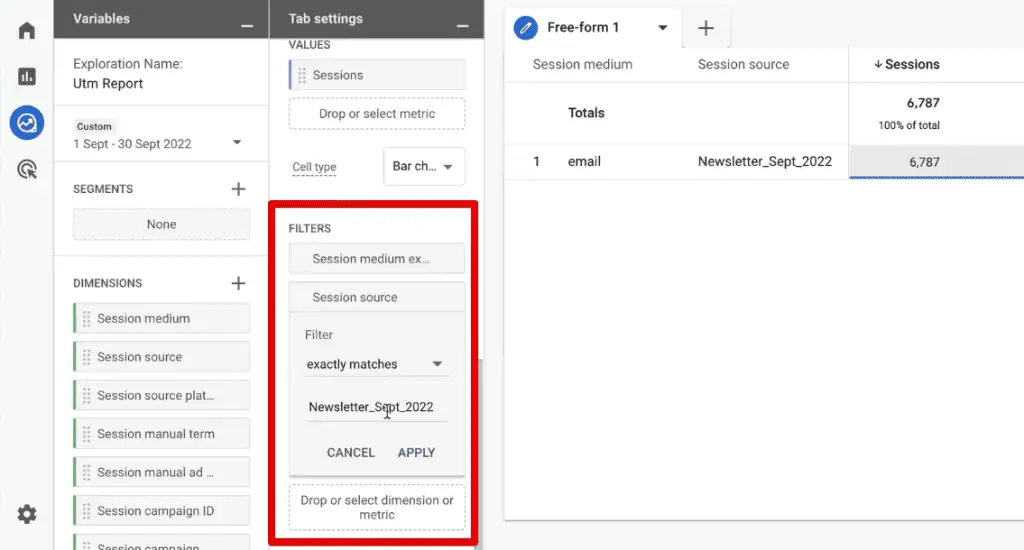
- "Include Only Selection" Trick: If you’re analyzing a specific campaign, like "Newsletter_Sept_2022 / email," simply right-click on that row in your data table and select "Include Only Selection." GA4 will automatically generate and apply the corresponding filters for
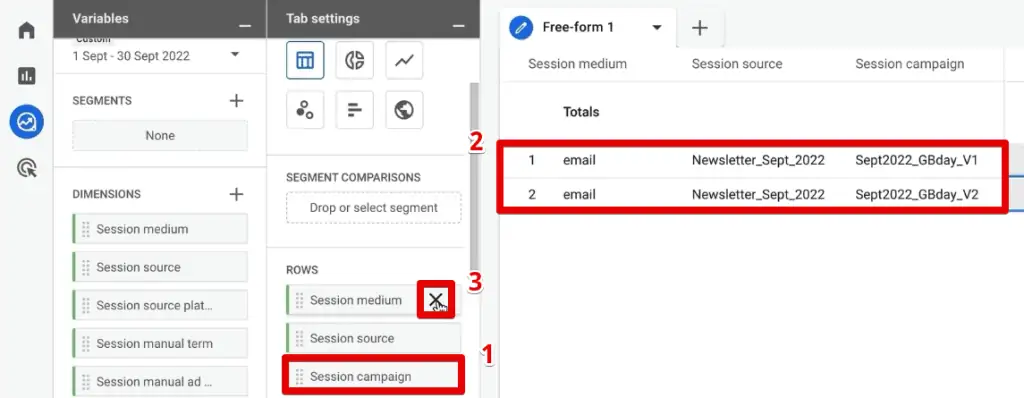
Session medium(exactly matchesemail) andSession source(exactly matchesNewsletter_Sept_2022). This significantly streamlines the analysis. - Drilling Down Further: Once filtered, you can remove the
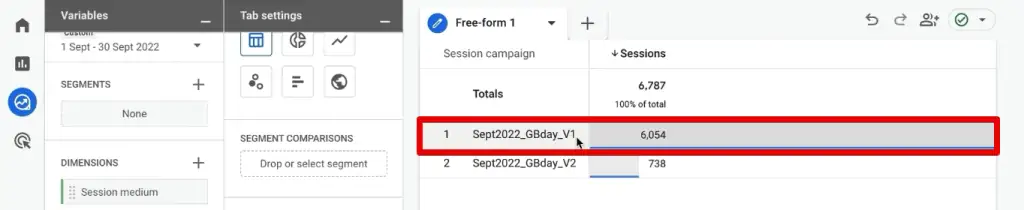
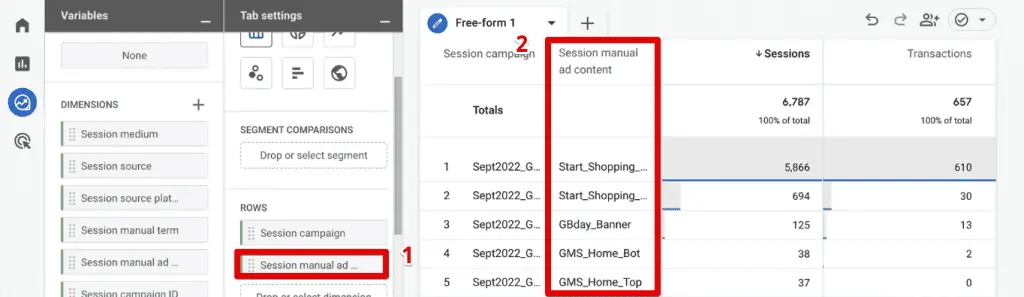
Session mediumandSession sourcefrom the "Rows" section and addSession campaignto see the performance of different campaigns within that specific source/medium. For instance, you might see "birthday_campaign" or "newsletter_v1" and "newsletter_v2." This allows for direct comparison of different creatives or offers. AddSession manual ad contentto further break down performance by specific elements (e.g., "Start_Shopping_Button" vs. "Birthday_Banner").
- "Include Only Selection" Trick: If you’re analyzing a specific campaign, like "Newsletter_Sept_2022 / email," simply right-click on that row in your data table and select "Include Only Selection." GA4 will automatically generate and apply the corresponding filters for
Chronology Example (Google Merchandise Store):
Using the Google Merchandise Store as a case study, we can observe traffic from a "Newsletter_Sept_2022." After applying filters for Session medium = email and Session source = Newsletter_Sept_2022, we can then pivot to Session campaign to see "birthday_campaign," "newsletter_v1," and "newsletter_v2." Adding Session manual ad content would reveal the performance of "Start_Shopping_Button" versus "Birthday_Banner" within these campaigns. This multi-layered approach quickly reveals which campaign versions and content elements are driving the most sessions and transactions.
Comparing Different Versions of UTM Content Through Segments
To compare specific subsets of your data (e.g., the performance of "Start_Shopping_Button" content across different campaigns or over time), GA4 segments are invaluable.
- Creating a Segment from Selection: With your exploration report filtered to a specific content (e.g., "Start_Shopping_Button"), right-click on that content row and choose "Create Segment from Selection." This automatically creates a user or session segment based on all currently applied filters (source, medium, campaign, content). Name it clearly (e.g., "Newsletter Start Button Clicks").
- Comparing Segments: Remove all existing filters and dimensions from your report. Then, drag your newly created segment (and any other segments you wish to compare, such as a segment for a Google CPC campaign) into the "Segment Comparisons" section. Add a dimension like
Session mediumto the "Rows" section, and your metrics to "Values." This will display the performance of each segment side-by-side, allowing for powerful comparative analysis. For instance, comparing the "Newsletter Start Button Clicks" segment with a "Google CPC Campaign" segment could reveal which channel delivers higher transactions or engagement for similar calls to action.
This segment-based approach is flexible, allowing you to compare any data points against each other and even create audiences for retargeting in Google Ads.
Advanced Strategies for UTM Mastery
For those looking to push the boundaries of attribution, GA4 offers advanced customization options.
-
Custom UTM Parameters via Google Tag Manager: When the standard UTM parameters (
source,medium,campaign,content,term,id,source_platform) don’t capture all the nuances of your marketing efforts (e.g., specific partner IDs, internal tracking codes), you can define custom UTM parameters. These require configuration within Google Tag Manager (GTM) to capture their values from the URL query string and then send them to GA4 as custom dimensions. This allows for hyper-specific tracking tailored to unique business needs.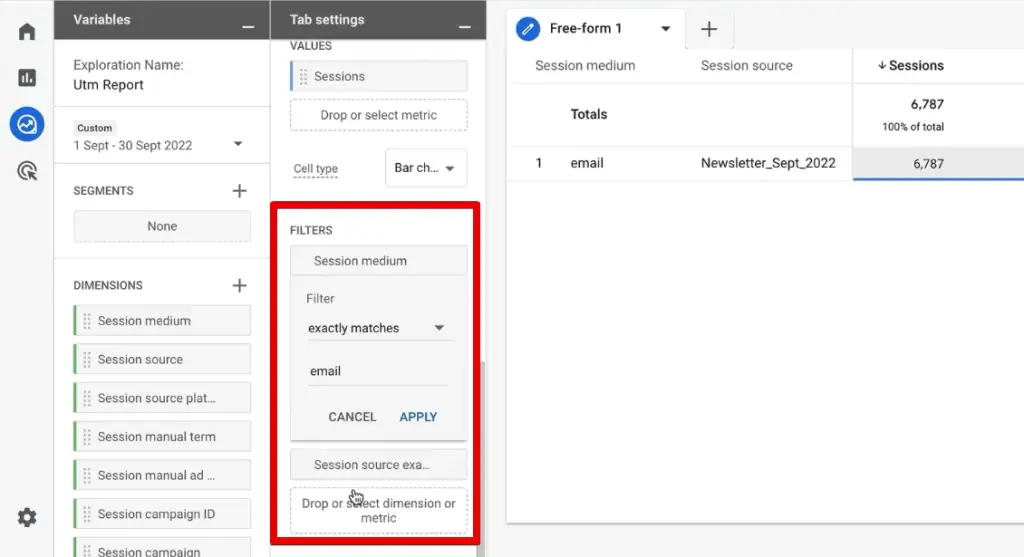
- Official Response/Supporting Data: Refer to Google’s documentation on creating custom dimensions and MeasureSchool’s guide on "How to Create Custom UTM Parameters via Google Tag Manager" for step-by-step instructions.
-
Passing UTM Parameters to CRM Tools: True full-funnel attribution often requires connecting marketing data with sales data in a Customer Relationship Management (CRM) system. This involves preserving UTM parameters beyond the initial landing page visit.
- Cookie-Based Preservation: A common technique is to store incoming UTM parameters in first-party cookies when a user first lands on your site. When the user later fills out a form (even after navigating multiple pages), these stored UTM values can be dynamically passed into hidden fields within the form. This ensures that when the lead enters your CRM, the original source, medium, and campaign data are attached, providing sales teams with crucial context about lead origin.
- Official Response/Supporting Data: Resources like "How to Capture UTM Parameters in (Hidden) Form Fields" or "How to Track Lead Sources in ConvertKit with UTM Codes" offer practical guidance. This seamless data flow is critical for calculating true customer lifetime value (CLV) and optimizing lead generation strategies.
Troubleshooting Tips for Misattributed Traffic
Despite best efforts, misattributed traffic can occur, often signaling issues with UTM implementation. Recognizing and rectifying these common problems is crucial.
-
Too Much Direct Traffic: If your GA4 reports show an unusually high percentage (e.g., 25-30%+) of traffic attributed to "Direct," it’s a strong indicator of missing or incorrect UTM tagging. Direct traffic typically comes from users typing your URL directly, using bookmarks, or from "dark social" (e.g., private messaging apps). Without UTMs, traffic from untagged email campaigns, PDFs, or some social shares can fall into this bucket, masking the true performance of these channels. The implication is a distorted view of brand familiarity and missed opportunities for optimization.
-
Wrong Source Bucket Attribution: This happens when your
utm_mediumorutm_sourcevalues don’t align with GA4’s default channel groupings. For example, if you useutm_medium=psoc(paid social) instead of Google’s standardpaid, GA4 might misclassify this traffic as "Organic Social" rather than "Paid Social."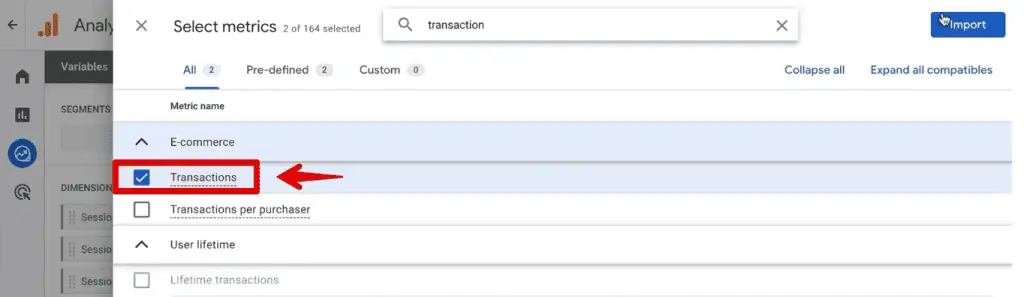
- Implication: This skews the performance metrics for both organic and paid channels, making it difficult to assess the effectiveness of your ad spend.
- Fix: Familiarize yourself with GA4’s default channel grouping rules and ensure your UTM values conform to them. Custom channel groupings can also be created in GA4 for more flexibility, but it’s often easier to align with defaults where possible.
-
Fragmented Traffic: Inconsistent naming conventions lead to data fragmentation. As mentioned earlier,
utm_source=Facebookandutm_source=facebookwill appear as two separate entries. This problem is compounded with multiple contributors to campaigns.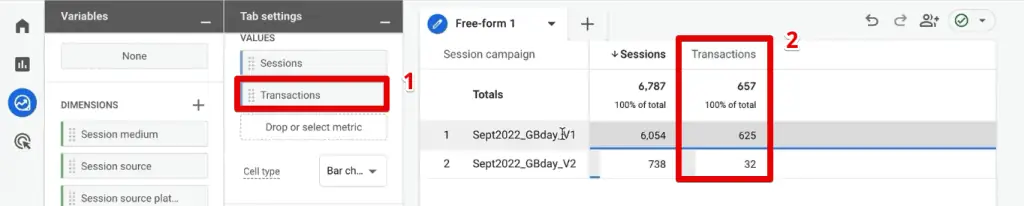
- Implication: Fragmented data makes it impossible to get an accurate aggregate view of a channel or campaign’s performance, requiring manual aggregation and increasing the risk of errors.
- Fix: Enforce a strict, well-documented UTM naming convention across all teams and marketing efforts. Tools and templates can help standardize inputs, minimizing human error.
Summary:
Mastering UTM parameters in Google Analytics 4 is no longer optional; it’s a fundamental skill for any data-driven marketer. This guide has illuminated the path to not only creating robust UTMs but, crucially, to effectively interpreting them within GA4.
By leveraging both the standard Traffic Acquisition reports for quick insights and the highly flexible Exploration reports for deep dives, you can transform raw traffic data into actionable intelligence. The ability to create segments and even audiences based on specific UTM performance further empowers marketers to optimize campaigns, personalize user experiences, and drive superior business outcomes.
From understanding the "who, how, and what" of your traffic sources to implementing advanced strategies like custom dimensions and CRM integration, a thorough grasp of UTMs in GA4 ensures that every marketing dollar is spent wisely. Remember, the key is consistent tagging, diligent analysis, and a commitment to continuous optimization based on the rich insights UTMs provide. Whether you’re a GA4 novice or an experienced analyst, the depth of data available through effective UTM tracking is a game-changer for digital marketing attribution.
