
Unlocking Marketing ROI: A Comprehensive Guide to Tracking Lead Sources in ActiveCampaign with Google Tag Manager
London, UK – In today’s competitive digital landscape, understanding the precise origins of your leads is no longer a luxury, but a fundamental necessity for strategic marketing and robust business growth. Many organizations struggle to accurately attribute sales or conversions back to their initial source, especially when prospects revisit a website multiple times before engaging. This gap in attribution can lead to misallocated marketing budgets, inefficient campaign optimization, and a clouded view of customer journeys.

This article delves into a powerful, step-by-step methodology for meticulously tracking lead sources in ActiveCampaign by leveraging the versatility of UTM parameters, first-party cookies, and the automation capabilities of Google Tag Manager (GTM). By integrating these tools, businesses can ensure that every lead’s journey is mapped from its very first interaction, providing invaluable insights for informed decision-making.
The Attribution Imperative: Why Tracking Lead Sources Matters
At its core, lead source tracking is about achieving accurate attribution. When a user first discovers your brand through a paid ad, a social media post, an organic search, or an email campaign, they carry with them crucial information embedded in the URL – the UTM parameters. However, these parameters often disappear as users navigate away from the landing page, making it challenging to link subsequent actions, like filling out a signup form, to that initial touchpoint.
Without proper source attribution, marketers operate in the dark. They cannot definitively answer critical questions such as:
- Which marketing channels are driving the most valuable leads?
- Which campaigns deliver the highest return on investment (ROI)?
- Where should future marketing budgets be concentrated for maximum impact?
- What is the true customer acquisition cost (CAC) for each channel?
The inability to attribute leads accurately can result in wasted ad spend, missed opportunities for personalization, and a skewed understanding of the customer lifecycle. By systematically capturing and storing this "first-touch" attribution data directly within a Customer Relationship Management (CRM) system like ActiveCampaign, businesses gain a clear, actionable picture of their marketing effectiveness. This foundational data empowers them to optimize campaigns, refine targeting, and ultimately drive more profitable growth.

Building the Foundation: ActiveCampaign Custom Fields
The initial step in this robust attribution strategy involves preparing ActiveCampaign to receive and store the incoming lead source data. This is achieved by creating dedicated custom fields for each relevant UTM parameter.

Chronology of ActiveCampaign Setup:

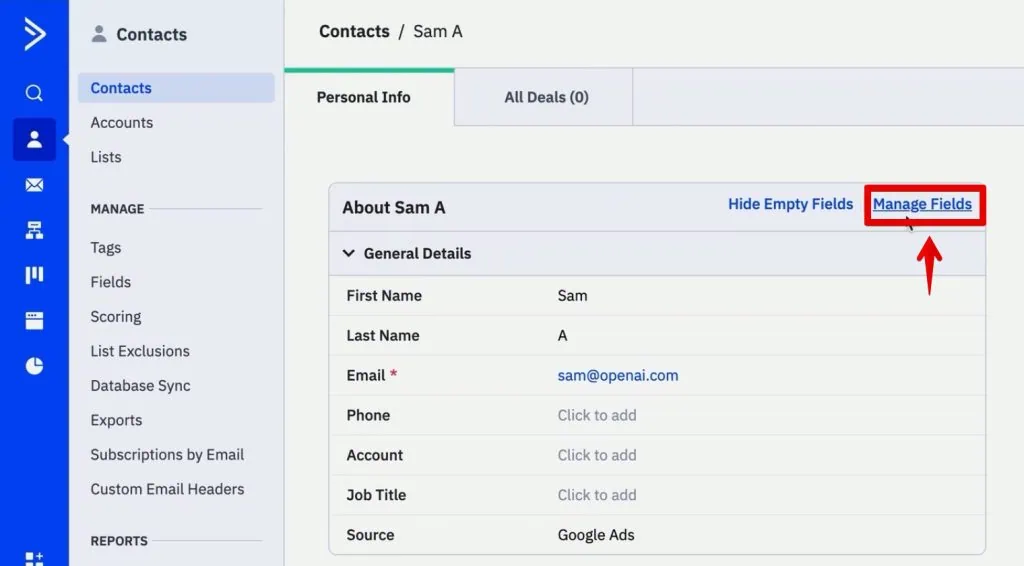
- Accessing Contact Management: Navigate to the "Contacts" section within ActiveCampaign and select "Manage Fields." This area serves as the central hub for defining all contact-specific data points.
- Defining UTM Fields: For comprehensive tracking, it is recommended to create custom text fields for the five most common and critical UTM parameters:
utm_source: Identifies the origin of the traffic (e.g., Google, Facebook, newsletter).utm_medium: Specifies the channel of the traffic (e.g., CPC, social, email, organic).utm_campaign: Denotes a specific campaign or promotion (e.g., "summer_sale_2024").utm_content: Distinguishes between similar content or links within the same ad (e.g., "textlink," "banner_ad").utm_term: Tracks the keyword used for paid search campaigns.
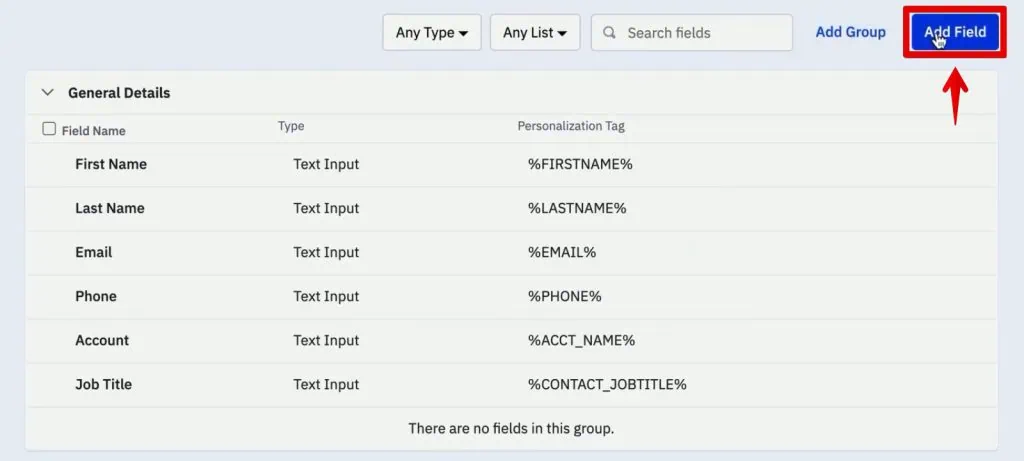
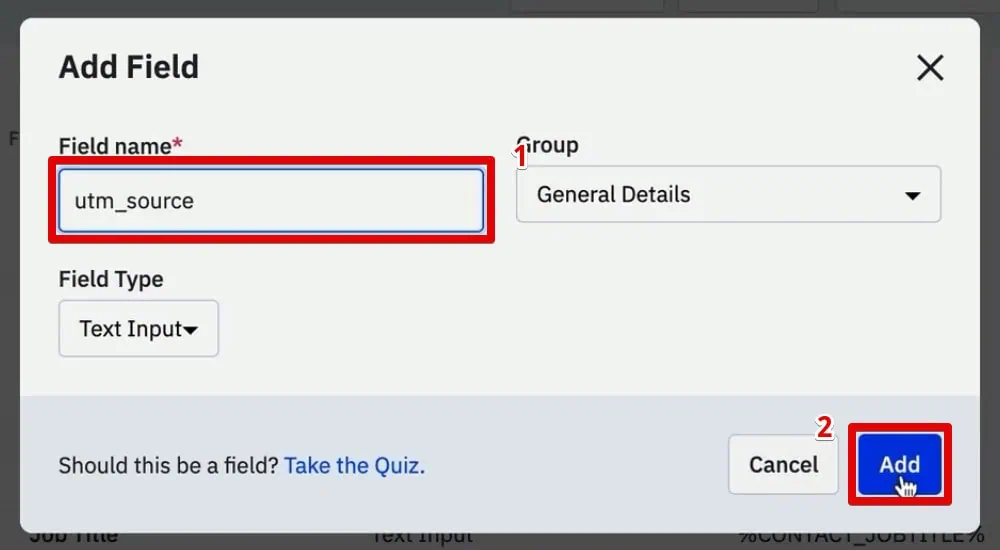
- Field Creation Process: For each UTM parameter, click "Add Field," provide a descriptive name (e.g., "utm_source"), and ensure the field type is set to "Text Input." Repeat this for all five parameters. While other UTM parameters exist, these five provide a solid foundation for most attribution needs.
- Verification: Once created, these new custom fields will appear within each contact’s profile on the ActiveCampaign contacts page. Initially, they will be empty, awaiting data from incoming leads. The goal is to automate the population of these fields directly from user interactions on your website, ensuring data accuracy and minimizing manual effort.
Crafting the Seamless User Experience: ActiveCampaign Forms
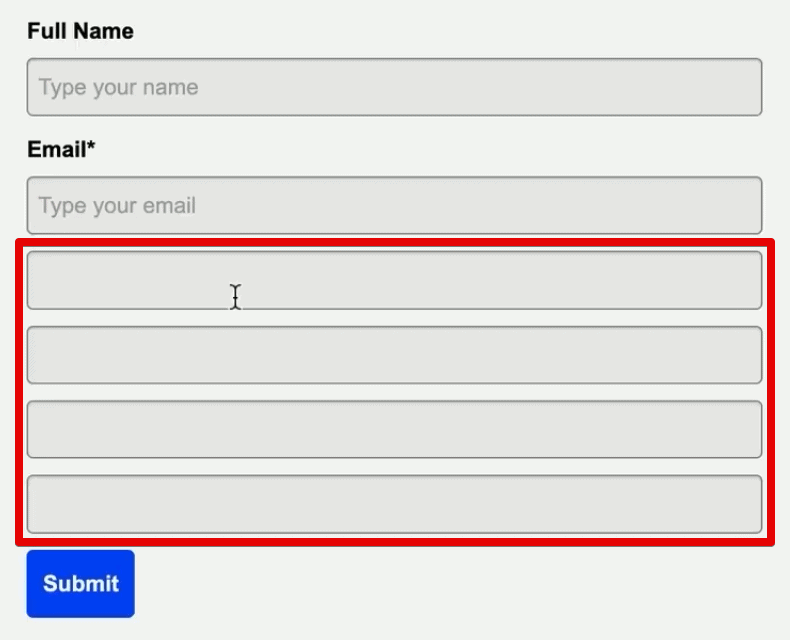
With the custom fields in place, the next step involves creating an ActiveCampaign form that can capture this data, albeit discreetly. The key here is to embed the form on your website with hidden fields, so users only see the essential information they need to provide (e.g., name, email).
Chronology of Form Creation and Customization:

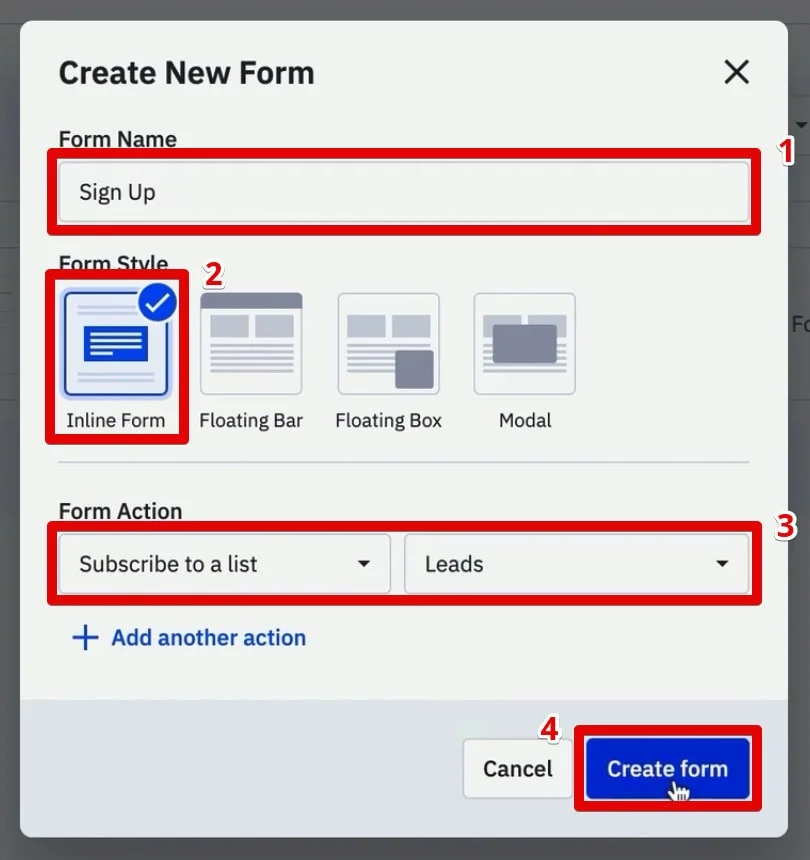
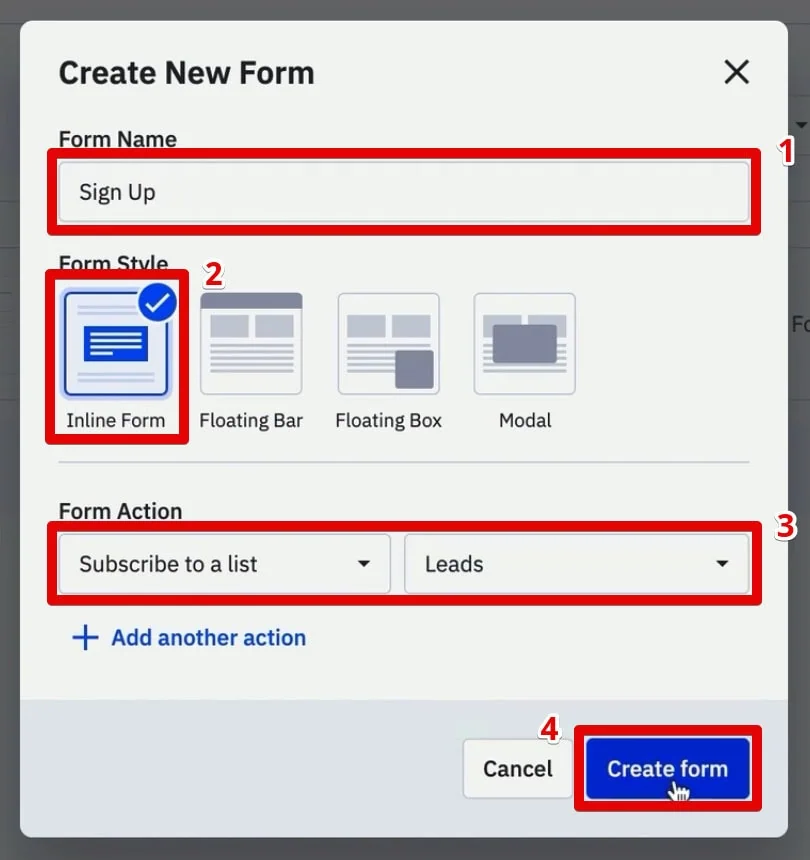
- Initiating Form Creation: In ActiveCampaign, navigate to "Website" and then "Forms." Click to create a new form.
- Form Configuration:
- Name: Give the form a clear, internal name (e.g., "Website Signup with UTMs").
- Form Style: Crucially, select "Inline Form." This style is necessary because it provides the raw HTML code that can be modified to hide the UTM fields. Other form styles might not allow for the necessary HTML alterations.
- Form Action: Specify the action the form should take upon submission, such as "Subscribe to a list" and link it to your relevant leads list.
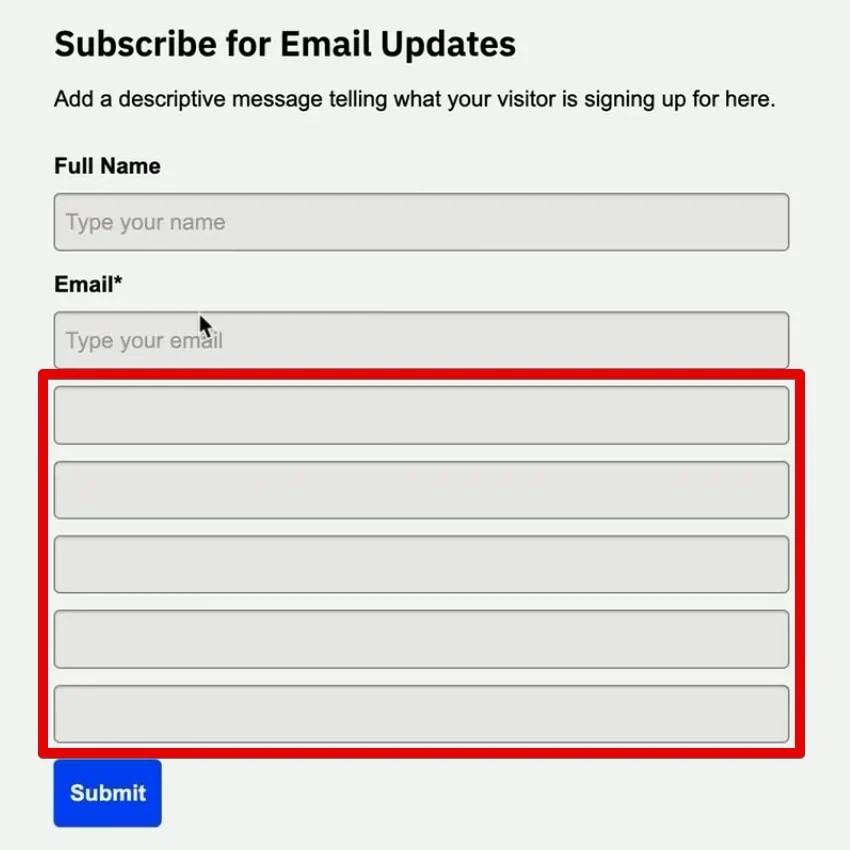
- Adding Custom Fields to the Form: Drag and drop the previously created UTM custom fields onto the form builder. Along with essential fields like "Email" and "Full Name," ensure all five UTM parameters (
utm_source,utm_medium,utm_campaign,utm_content,utm_term) are present. - Hiding Field Headers: For each UTM parameter field on the form, remove its header text. This is a preliminary step before completely hiding the fields from the user’s view.
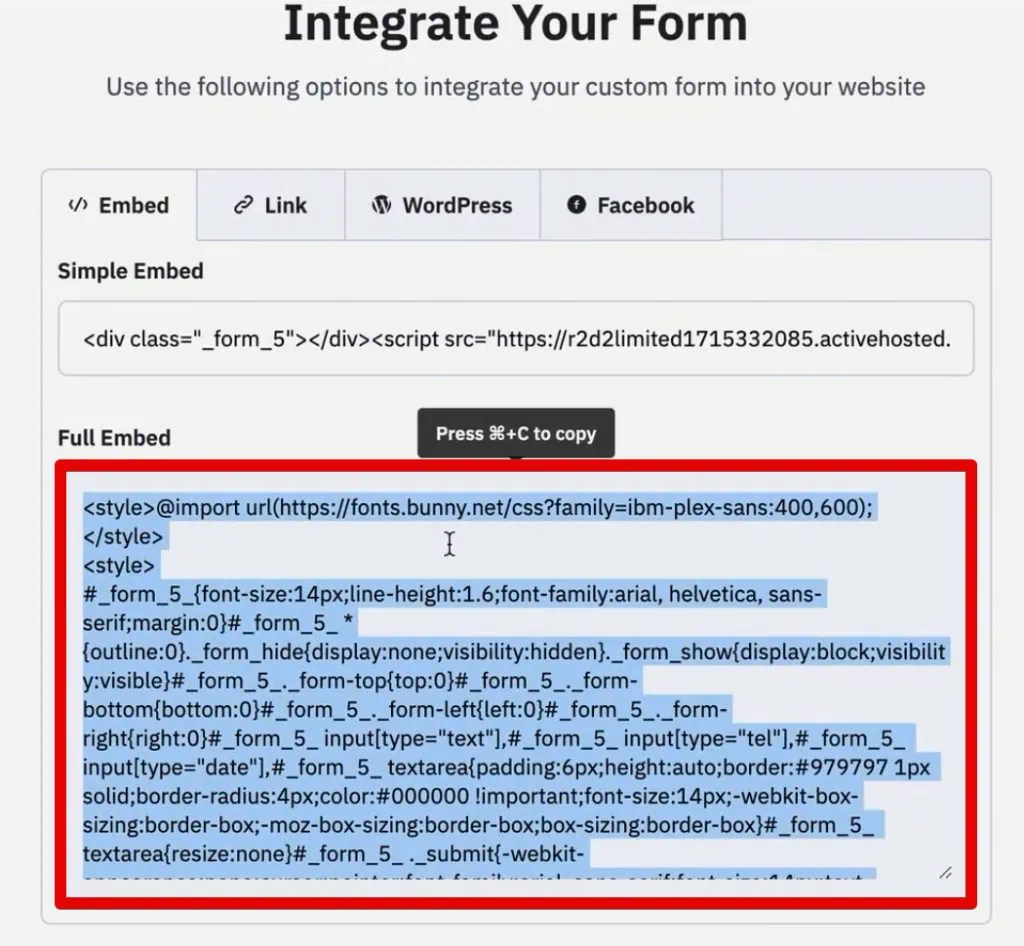
- Generating Embed Code: After configuring the form, click "Integrate" to obtain the full embed HTML code. This code will contain all the form fields, including the UTM parameters, ready to be placed on your website.
- Embedding on Your Website: Copy the generated HTML code and paste it into the source HTML of the desired page on your website (e.g., your WordPress page editor’s HTML view).
- Modifying HTML for Hidden Fields:
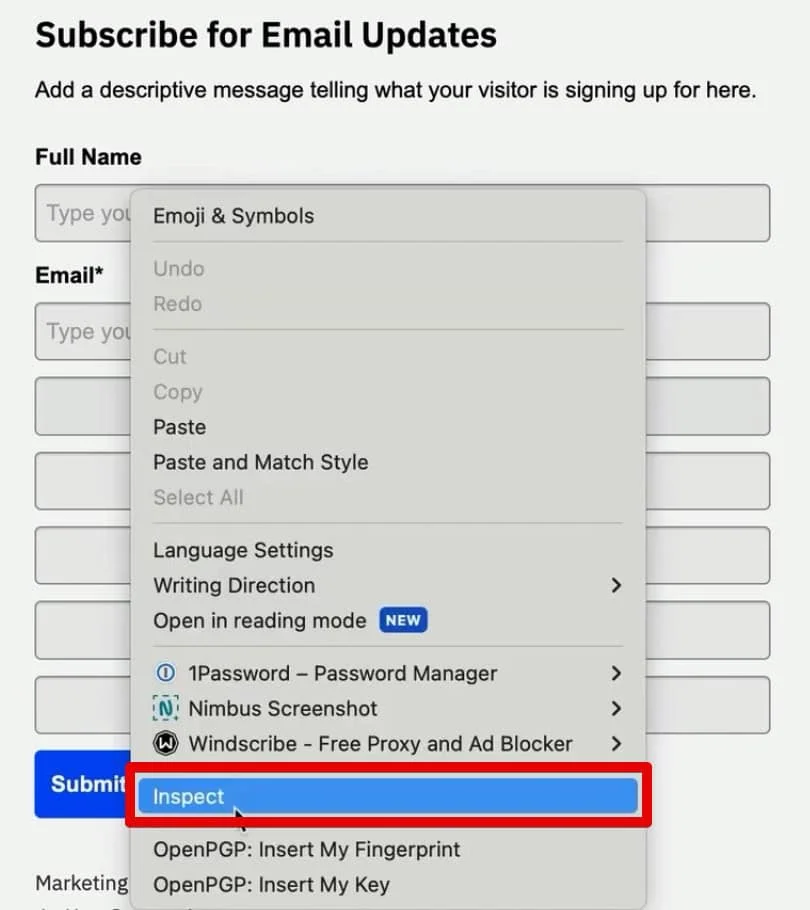
- Identify Field IDs/Names: Use your browser’s developer tools (right-click -> Inspect) to examine the embedded form on your website. Locate the
<input>tags corresponding to each UTM field. Pay close attention to theiridordata-nameattributes. For example, a field might haveid="field_5"anddata-name="utmsource". - Change Input Type to "hidden": Within the HTML code on your website, for each UTM parameter’s
<input>tag, change thetypeattribute from"text"to"hidden". This renders the field invisible to the end-user while still allowing it to accept data programmatically. Caution: Double-check that you are only changing the type for your UTM fields and not essential user-facing fields like email or name.
- Identify Field IDs/Names: Use your browser’s developer tools (right-click -> Inspect) to examine the embedded form on your website. Locate the
- Verification: Save the changes to your website page and refresh it. Visually confirm that only the essential user-facing fields are visible, while the UTM fields are no longer displayed. Despite being hidden, they remain part of the form’s structure, ready to be populated.
Capturing the Ephemeral: Storing UTMs with First-Party Cookies via GTM
The challenge with UTM parameters is their transient nature; they reside in the URL query string and disappear when a user navigates to another page on your site. To preserve this crucial "first-touch" information, we leverage first-party cookies, set and managed via Google Tag Manager (GTM).

Chronology of GTM Cookie Setup:

- GTM Tag Creation: In your Google Tag Manager workspace, go to "Tags" and click "New."
- Tag Configuration: Select "Custom HTML" as the tag type.
- Implementing the Cookie Script: Paste a JavaScript snippet into the HTML section. This script is designed to:
- Detect if UTM parameters are present in the current URL’s query string.
- If found, extract these parameters.
- Store the extracted UTM information (or the entire query string containing them) into a first-party cookie on the user’s browser. This cookie will persist across different pages of your website, effectively "remembering" the lead’s initial source.
- Example (conceptual snippet – actual script would be more robust):
<script>
(function()
    var utmParams = window.location.search;
    if (utmParams.indexOf('utm_') > -1)
        var d = new Date();
        d.setTime(d.getTime() + (30*24*60*60*1000)); // Set cookie for 30 days
        var expires = "expires="+ d.toUTCString();
        document.cookie = "source_query=" + utmParams + ";" + expires + ";path=/";

)();
</script>
- Naming the Tag: Give the tag a descriptive name, such as "HTML – Set UTM Cookie."
- Trigger Configuration: This tag should fire only when a user first lands on a page with UTM parameters.
- Select "Triggering" and create a new trigger.
- Choose "Page View" as the trigger type.
- Select "Some Page Views."
- Set the condition: "Page URL"
containsutm_. This ensures the tag fires specifically when UTM parameters are present in the URL.
- Naming and Saving: Name the trigger (e.g., "Page View – Has UTMs") and save both the trigger and the tag.
- Testing with GTM Preview Mode:
- Enter GTM Preview Mode.
- Access your website using a URL that includes various UTM parameters (e.g.,
yourwebsite.com/?utm_source=facebook&utm_medium=cpc&utm_campaign=summer_sale). - Navigate to a different page on your website where the UTM parameters are no longer in the URL.
- Open your browser’s developer tools (Application tab -> Cookies). Verify the presence of the
source_querycookie and confirm that its value contains the captured UTM information. This confirms the first-touch data is being successfully stored and persists across pages.
Automating Data Flow: Populating Hidden Form Fields with GTM
With the UTM information now reliably stored in a first-party cookie, the final piece of the puzzle is to automatically extract this data from the cookie and populate the hidden fields in your ActiveCampaign form when a user reaches a page containing that form.

Chronology of GTM Form Population Setup:
- GTM Second Tag Creation: In GTM, create another new "Custom HTML" tag.
-
Implementing the Form Fill Script: Paste a second JavaScript snippet. This script performs the following functions:

- Reads the
source_querycookie (or whatever you named your UTM cookie). - Parses the UTM parameters from the cookie’s value.
- Identifies the hidden input fields in your ActiveCampaign form using CSS selectors.
- Populates the
valueattribute of each hidden input field with its corresponding UTM parameter. -
Example (conceptual snippet – actual script would be more robust and handle parsing):
<script>
(function()
    function getCookie(name)
        var nameEQ = name + "=";
        var ca = document.cookie.split(';');
        for(var i=0;i < ca.length;i++)
            var c = ca[i];
            while (c.charAt(0)==' ') c = c.substring(1,c.length);
            if (c.indexOf(nameEQ) == 0) return c.substring(nameEQ.length,c.length);

        return null;


    var cookieValue = getCookie('source_query');
    if (cookieValue)
)();
</script>
- Reads the
- Customizing CSS Selectors: The critical part of this script is accurately mapping the parsed UTM values to the correct hidden input fields in your form. You will need to replace the generic CSS selectors (e.g.,
'input[data-name="utmsource"]') with the specific selectors for your ActiveCampaign form fields.- Use Chrome Developer Tools: Right-click on your hidden form field (in the HTML source view, not the visual form) and select "Copy" -> "Copy selector." This will give you a precise CSS selector. Alternatively, use attributes like
data-nameif they are unique and descriptive (e.g.,input[data-name="utmsource"]). - Leveraging LLMs: For users less familiar with CSS selectors, AI tools like ChatGPT can be helpful. Provide the HTML snippet of your form fields and ask for the appropriate CSS selectors to target specific fields.
- Use Chrome Developer Tools: Right-click on your hidden form field (in the HTML source view, not the visual form) and select "Copy" -> "Copy selector." This will give you a precise CSS selector. Alternatively, use attributes like
- Naming the Tag: Name this tag "HTML – Fill Hidden UTM Fields."
- Trigger Configuration: This tag needs to fire when the ActiveCampaign form is fully loaded and ready to be interacted with.
- Create a new trigger and select "DOM Ready" as the trigger type. This ensures that the page’s Document Object Model (DOM) is fully constructed before the script attempts to interact with form elements.
- Select "Some DOM Ready Events."
- Set the condition: "Page Path"
contains[your-form-page-path]. Replace[your-form-page-path]with the specific URL path where your ActiveCampaign signup form is embedded (e.g.,/crm-leads,/signup,/contact).
- Saving: Save both the trigger and the tag.
Verification and Deployment: Ensuring Data Integrity
Thorough testing is paramount to ensure the entire attribution pipeline functions as intended before making it live.

Chronology of Testing and Publishing:
- Re-enter GTM Preview Mode: Initiate the GTM Preview Mode once more.
- Simulate User Journey:
- Access your website with UTM parameters in the URL (e.g.,
yourwebsite.com/?utm_source=twitter&utm_medium=social&utm_campaign=winter_promo). - Navigate to a different page on your site to confirm the UTMs disappear from the URL but are retained in the
source_querycookie (verify via developer tools -> Application -> Cookies). - Proceed to the page containing your ActiveCampaign signup form.
- Access your website with UTM parameters in the URL (e.g.,
- Verify Hidden Field Population:
- While on the form page, open your browser’s developer tools.
- Inspect the HTML of your hidden UTM fields. Temporarily change their
typeattribute from"hidden"back to"text"to make them visible. - Confirm that these fields are now pre-populated with the UTM values from your
source_querycookie. This validates that the GTM script is correctly extracting data and filling the form.
- Submit Test Lead: Fill out the visible name and email fields on the form and submit it.
- ActiveCampaign Verification: Log into your ActiveCampaign account.
- Navigate to the "Contacts" section.
- Locate the newly created test contact.
- Open the contact’s profile and verify that the custom UTM fields (
utm_source,utm_medium,utm_campaign,utm_content,utm_term) are accurately populated with the data from your test URL.
- Publish GTM Version: Once all tests confirm the accurate flow of data, return to your GTM workspace. Click the "Submit" button.
- Provide a descriptive "Version Name" (e.g., "Implemented ActiveCampaign UTM Tracking").
- Add a brief "Version Description" detailing the changes.
- Click "Publish" to make your GTM changes live for all website visitors.
Strategic Implications: Leveraging Attributed Data
The successful implementation of this lead source tracking mechanism provides ActiveCampaign users with a wealth of actionable data. The implications extend far beyond simple reporting:

- Precise Marketing ROI Calculation: With attributed data, marketers can accurately calculate the ROI for each channel and campaign, justifying budget allocation and optimizing spend.
- Enhanced Lead Segmentation and Personalization: Contacts can be segmented based on their original source, allowing for highly targeted email campaigns, automated workflows, and personalized content delivery tailored to their initial interest.
- Improved Lead Scoring: Knowing a lead’s source can be incorporated into lead scoring models, prioritizing high-value leads from historically effective channels.
- Optimized Customer Journeys: By analyzing the paths taken by successful leads, businesses can identify bottlenecks or opportunities to streamline the customer journey for future prospects.
- Data-Driven Decision Making: Every marketing decision, from content creation to ad placement, can be backed by concrete data on what drives conversions.
Beyond the Basics: Advanced Attribution and Future Tools
While this method provides robust first-touch attribution, the world of marketing analytics is constantly evolving. Considerations for more advanced tracking include:
- Multi-Touch Attribution: This method focuses on the first touch. For a more complete picture, businesses might explore multi-touch attribution models that credit all touchpoints along the customer journey.
- Offline Conversion Tracking: Integrating Google Click ID (GCLID) or Facebook Click ID (FBCLID) into your CRM allows you to connect online ad clicks with offline conversions, closing the loop on ad spend.
- Referrer Tracking: Capturing the HTTP referrer can provide additional context on where users came from, especially for direct or untagged traffic.
For those seeking an even simpler solution, emerging tools like the SourceLink App aim to automate much of this complex setup. By installing such an application, the need to manually create custom fields, fiddle with HTML, or write JavaScript for GTM can be eliminated, allowing businesses to immediately benefit from comprehensive lead source attribution directly in their CRM without the technical overhead.

Conclusion
The ability to accurately track lead sources in ActiveCampaign is a game-changer for digital marketers and business owners alike. By combining ActiveCampaign’s CRM capabilities with the power of Google Tag Manager, first-party cookies, and hidden form fields, organizations can move beyond guesswork to embrace data-driven decision-making. This robust methodology ensures that valuable first-touch attribution data is captured, preserved, and leveraged to optimize marketing strategies, enhance customer experiences, and ultimately, drive sustainable growth. Understanding where your leads come from is the first step towards intelligently scaling your success.
