
Unlocking Marketing ROI: A Comprehensive Guide to Tracking Lead Sources in ActiveCampaign with Google Tag Manager
London, UK – [Date of Publication] – In today’s highly competitive digital landscape, understanding the precise origin of every lead is paramount for optimizing marketing spend and driving sustainable business growth. While CRM platforms like ActiveCampaign are indispensable for managing customer relationships, accurately attributing sales and conversions back to their initial lead sources often presents a significant challenge. This is particularly true when potential customers revisit a website multiple times before converting, making the initial touchpoint difficult to pinpoint.

This article delves into a robust, step-by-step methodology for meticulously tracking lead sources within ActiveCampaign, leveraging the power of UTM parameters, Google Tag Manager (GTM), and first-party cookies. By implementing this strategy, businesses can gain invaluable insights into their marketing effectiveness, enabling data-driven decisions for budget allocation and campaign optimization.

The Imperative of Precise Lead Source Attribution
The inability to accurately attribute sales to their originating marketing channels creates a significant "attribution gap," leading to inefficient resource allocation and missed opportunities. Without a clear understanding of which campaigns, mediums, and content are truly driving conversions, marketers risk investing in underperforming channels or failing to scale successful ones.
Consider a scenario: a user clicks an ad with specific UTM parameters, browses your site, leaves, and returns directly days later to fill out a signup form. If the initial UTM data isn’t captured and preserved, the conversion might be erroneously attributed to "direct traffic," obscuring the true impact of the paid campaign. This makes a compelling case for sending comprehensive source information directly into your CRM, such as ActiveCampaign, ensuring every lead’s journey is meticulously documented from its very first interaction.
Accurate lead source tracking facilitates:
- Optimized Budget Allocation: Identify the most profitable channels and reallocate resources for maximum return on investment.
- Enhanced Personalization: Tailor follow-up communications and offers based on a lead’s original interest and behavior.
- Improved Campaign Performance: Understand which campaign elements (e.g., specific ads, keywords) are most effective.
- Clearer Reporting and Forecasting: Build reliable visualizations and forecasts based on verifiable conversion data.
The solution involves a synergy of ActiveCampaign’s custom fields, strategic form integration, and Google Tag Manager’s ability to capture and persist UTM parameters using first-party cookies.

Laying the Foundation: Creating Custom Fields in ActiveCampaign
The initial step in establishing this robust tracking system is to configure ActiveCampaign to store the granular lead source information. This requires creating dedicated custom fields within your contact profiles.

Chronology of Action:

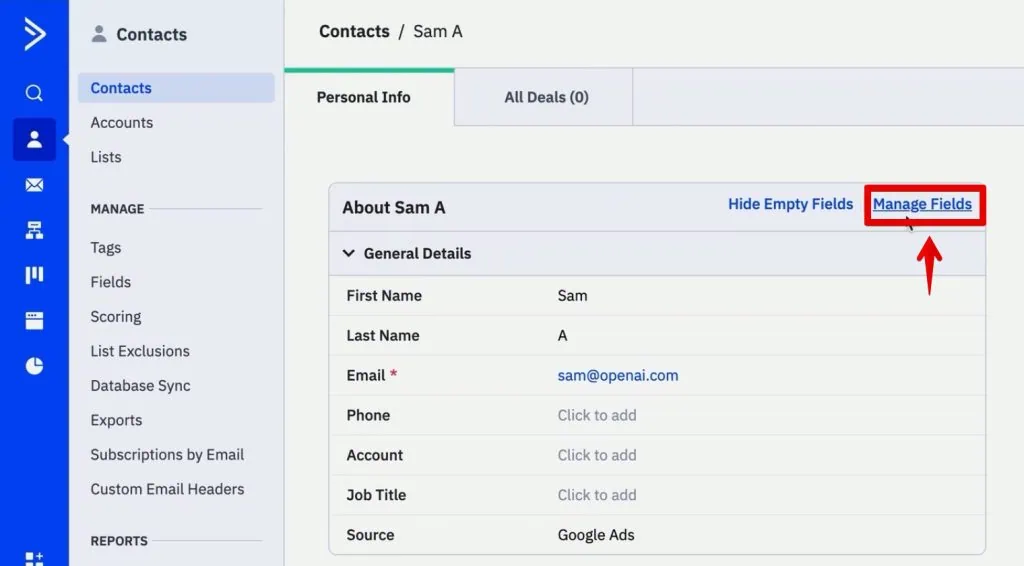
- Navigate to Contacts Management: Within your ActiveCampaign dashboard, locate the "Contacts" section and select "Manage Fields." This interface allows for the creation and organization of all custom data points associated with your contacts.
- Add New Fields for UTM Parameters: UTM parameters (Urchin Tracking Module) are standard tags added to URLs to track the source of website traffic. For comprehensive tracking, it is recommended to create fields for the five primary UTM parameters:
utm_source: Identifies the origin of your traffic (e.g., google, facebook, newsletter).utm_medium: Identifies the medium of the link (e.g., cpc, organic, email).utm_campaign: Identifies a specific campaign (e.g., summer_sale, new_product_launch).utm_content: Differentiates similar content within the same ad or link (e.g., text_link, banner_ad).utm_term: Identifies paid search keywords.
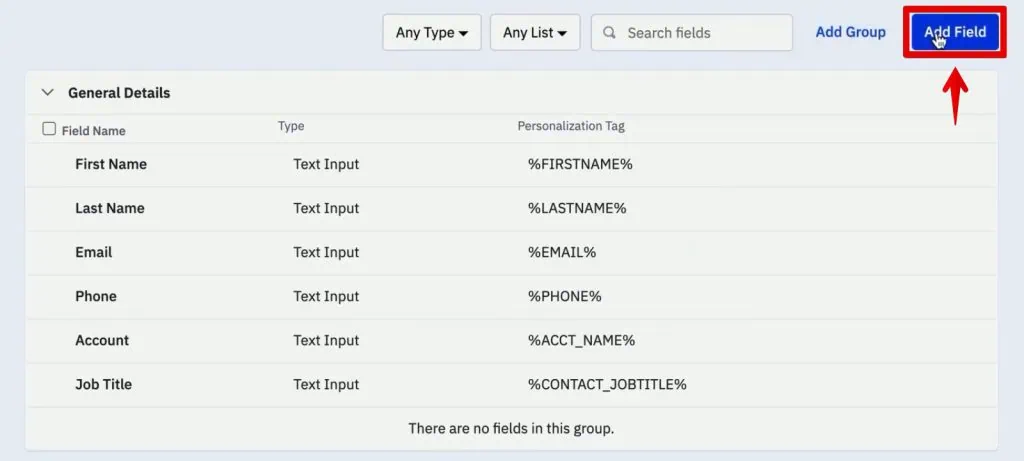
- Field Creation Process: For each UTM parameter:
- Click "Add Field" in the top-right corner.
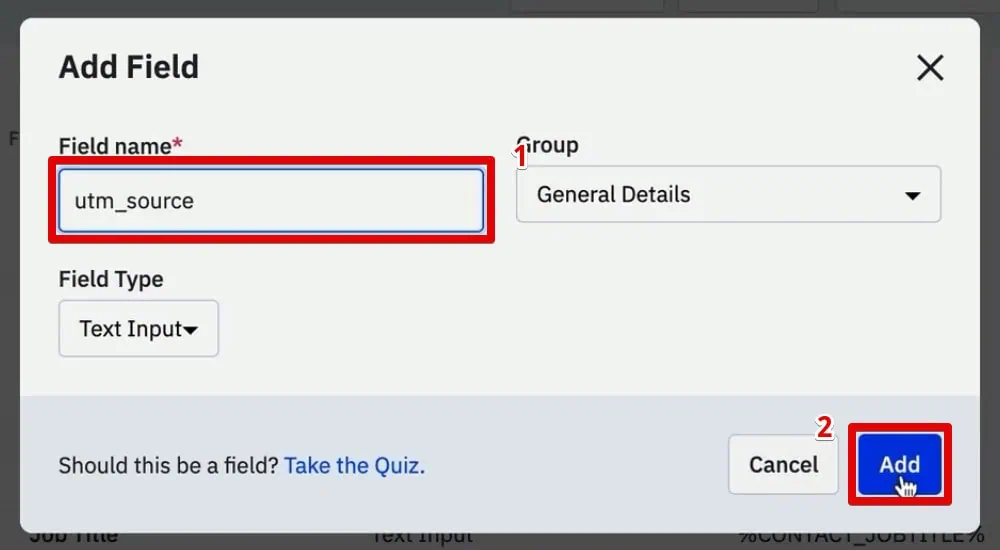
- Assign a descriptive name, such as "utm_source" (it’s best practice to match the parameter name for consistency).
- Select "Text Input" as the field type, as UTM values are typically short strings of text.
- Click "Add" to save the field.
- Repeat this process for
utm_medium,utm_campaign,utm_content, andutm_term.
Once created, these custom fields will appear within each contact’s profile in ActiveCampaign, ready to store the incoming lead source data. While manual entry is possible, the goal is to automate this population directly through your website forms.
Architecting the Capture Point: Creating and Integrating an ActiveCampaign Form
With the custom fields in place, the next step involves preparing an ActiveCampaign form that can capture this data. The critical requirement here is to use an "Inline Form," as this type allows for direct HTML manipulation, which is essential for hiding the UTM fields from users.

Chronology of Action:

- Access Form Creation: Navigate to "Website" > "Forms" within ActiveCampaign.
- Initiate New Form Creation: Click "Create a form."
- Configure Form Details:
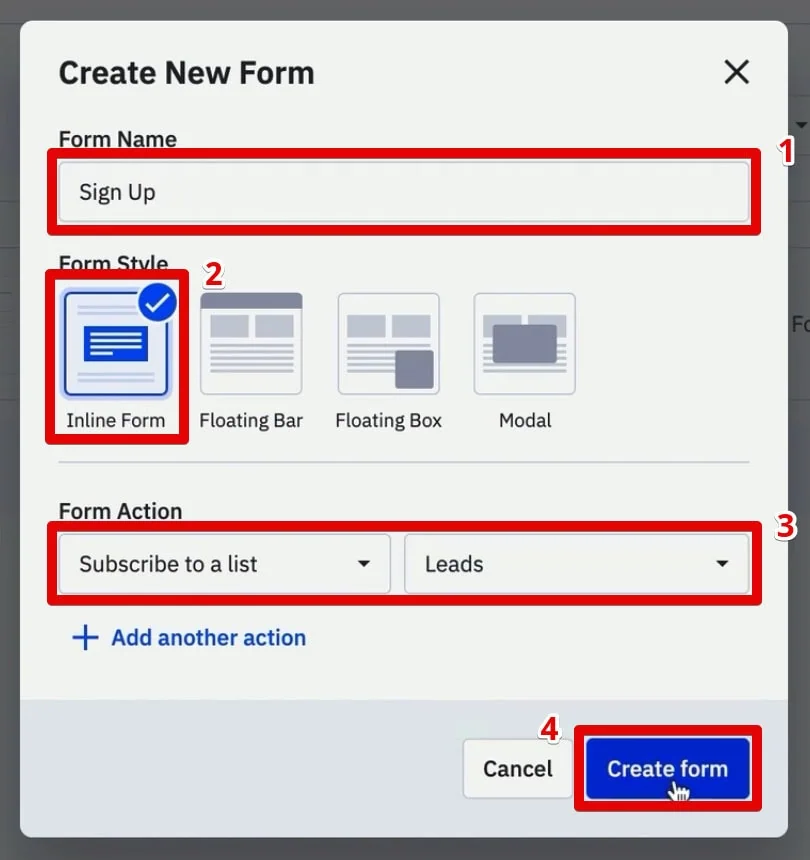
- Name the form (e.g., "Website Sign Up").
- Select "Inline Form" as the form type. This choice is crucial for the subsequent steps involving HTML modification.
- Define the form action, typically "Subscribe to a list," and choose the relevant contact list (e.g., "Leads").
- Click "Create form."
- Add Custom UTM Fields to the Form: Drag and drop the newly created UTM parameter fields from the available fields list onto your form. Ensure all five (source, medium, campaign, content, term) are included, in addition to standard fields like Name and Email.
- Remove Field Headers: For the UTM fields, delete the content of their respective field headers. This is a preparatory step for hiding them entirely from the user interface.
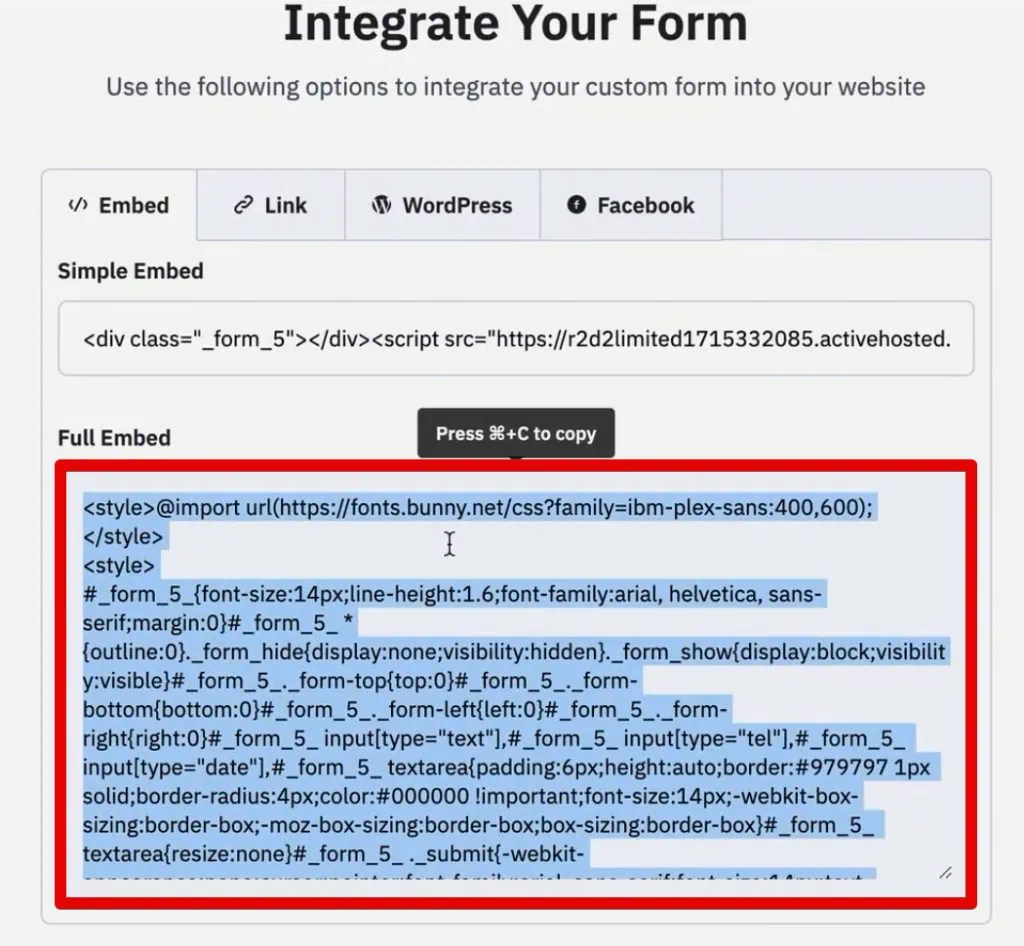
- Integrate the Form into Your Website: After saving the form, click "Integrate." ActiveCampaign will provide you with the full embed HTML code. Copy this code.
- Embed Code in Website: Paste the copied HTML code into the source HTML of the desired page on your website where the signup form will be displayed (e.g., using a custom HTML block in WordPress or directly editing the page template).
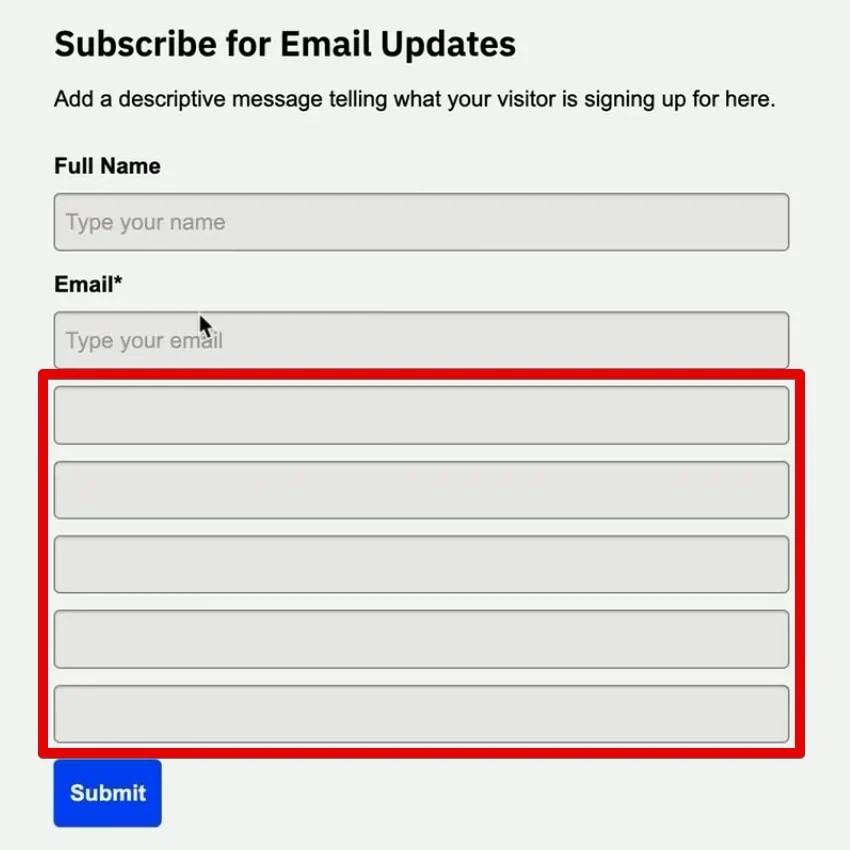
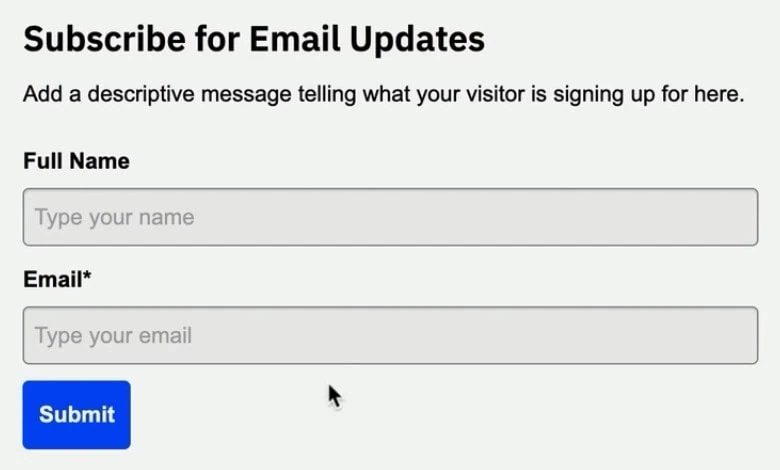
At this stage, your website will display the form, including the Name, Email, and the five UTM fields (albeit without headers). The next critical step is to make these UTM fields invisible to the user.

Stealth Integration: Hiding UTM Fields from User View
The UTM fields are for internal tracking purposes and should not be visible to website visitors. Hiding them ensures a clean user experience while preserving their functionality in the background.

Chronology of Action:
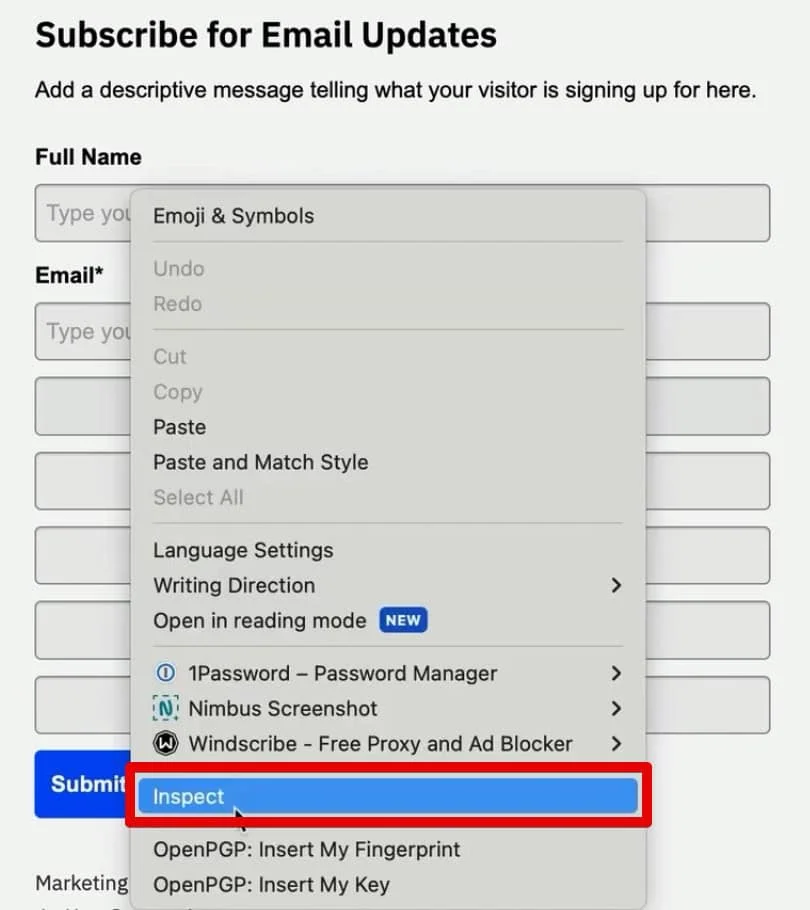
- Inspect Form Elements with Developer Tools: Open your website in a browser (e.g., Chrome) and navigate to the page containing the embedded form. Right-click on one of the UTM form fields (which currently appears as a blank input field) and select "Inspect" to open the browser’s Developer Tools.
- Identify Field Attributes: In the "Elements" tab of the Developer Tools, locate the HTML
inputtag corresponding to the inspected field. You will observe attributes likeid,name, anddata-name. Note down thedata-name(e.g.,utmsource) or theid(e.g.,field_5) for each UTM field. -
Modify HTML Code to Hide Fields: Return to your website’s HTML editor where the ActiveCampaign form code was embedded. For each UTM parameter’s
inputtag, change thetypeattribute fromtype="text"totype="hidden".
Example (before):
<input type="text" id="field_5" name="field_5" data-name="utmsource" value="" />Example (after):

<input type="hidden" id="field_5" name="field_5" data-name="utmsource" value="" />Caution: Double-check that you are only modifying the UTM fields and not inadvertently hiding essential user-facing fields like "Name" or "Email."
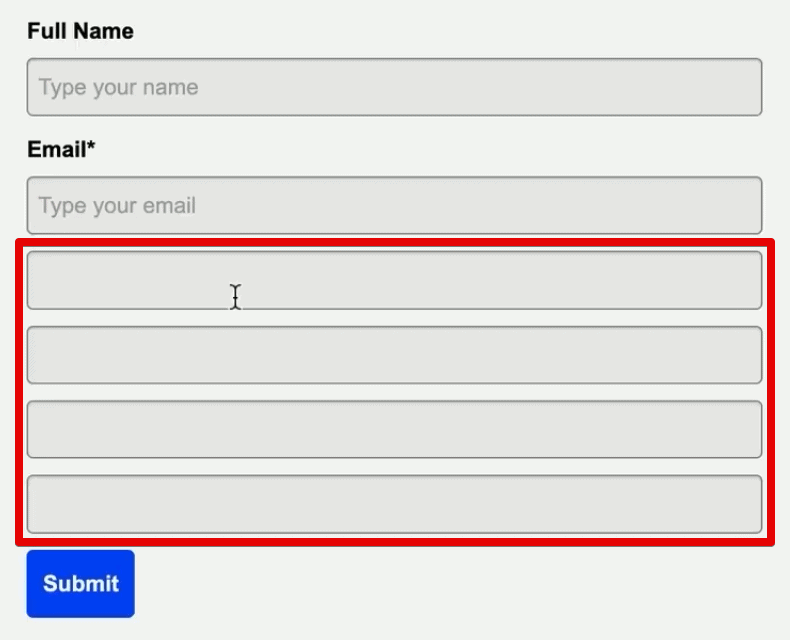
- Update and Verify: Save the changes to your website page and refresh the live page. Confirm that only the user-facing fields (Name, Email) are visible, while the UTM fields are now hidden. They remain present in the page’s HTML structure, ready to receive data.
Preserving Origin: Saving UTM Data with First-Party Cookies via Google Tag Manager
The challenge with UTM parameters is their ephemeral nature; they reside in the URL query string and disappear when a user navigates to a different page. To maintain this crucial attribution data across multiple page views and even subsequent sessions, it must be stored persistently. This is where first-party cookies, orchestrated by Google Tag Manager, become indispensable.

Supporting Data: First-Party Cookies
First-party cookies are set by the domain the user is currently visiting (your website). Unlike third-party cookies, they are generally more accepted by browsers and provide a reliable method for storing user-specific data directly associated with your site.
Chronology of Action: Setting Up the GTM Tag for Cookie Creation

- Access Google Tag Manager: Log into your GTM workspace.
- Create a New Tag: Go to "Tags" and click "New."
- Configure Tag Type: Select "Tag Configuration" and choose "Custom HTML." This allows you to inject custom JavaScript code into your website.
- Insert JavaScript for Cookie Setting: Paste a JavaScript snippet designed to read the URL’s query string and store the UTM parameters into a first-party cookie. A typical script would:
- Check for the presence of UTM parameters in the
window.location.searchstring. - Parse these parameters.
- Set a cookie (e.g.,
source_query) containing the parsed UTM values. The script should also handle cookie expiration to ensure the data persists for a reasonable duration (e.g., 30-90 days) but can be overwritten by new UTMs. - Expert Insight: The provided script example, "Source Form Fill," likely contains the necessary JavaScript. Ensure it correctly extracts
utm_source,utm_medium,utm_campaign,utm_content, andutm_term.
- Check for the presence of UTM parameters in the
- Name the Tag: Give the tag a descriptive name, such as "HTML – Set UTM Cookie."
Chronology of Action: Defining the Trigger for Cookie Capture
- Select Trigger Configuration: For this tag, the trigger is crucial. Click "Triggering" and create a new trigger.
- Choose Trigger Type: Select "Page View" as the trigger type.
- Define Trigger Condition: This tag should fire specifically when a page containing UTM parameters is loaded. Choose "Some Page Views" and set the condition to
Page URL contains utm_medium(or any common UTM parameter). This ensures the cookie is only set when initial UTM data is present. - Name and Save: Name the trigger (e.g., "PV – UTM Parameters Present") and save both the trigger and the tag.
Seamless Attribution: Populating Hidden Form Fields from Cookie Data
The final piece of this attribution puzzle involves transferring the UTM data from the persistent first-party cookie into the hidden ActiveCampaign form fields just before the user submits the form. This ensures that when the form is submitted, ActiveCampaign receives the original lead source information.

Chronology of Action: Configuring the GTM Tag for Form Field Population

- Create Another GTM Tag: Go to "Tags" and click "New" again.
- Configure Tag Type: Select "Tag Configuration" and choose "Custom HTML."
- Insert JavaScript for Form Population: Paste the second part of your "Source Form Fill" script. This script will:
- Read the
source_querycookie (created by the previous tag). - Parse the UTM parameters stored within that cookie.
- Locate the hidden input fields on the ActiveCampaign form using CSS selectors.
- Populate the
valueattribute of these hidden input fields with the corresponding UTM data. - Strategic Recommendation: The mapping of UTM parameters to form fields is critical. The script will need to know which HTML element corresponds to
utm_source,utm_medium, etc.- Identifying CSS Selectors: Re-use Chrome Developer Tools. Right-click on a hidden form field (you might need to temporarily unhide it or inspect its surrounding HTML to find its
idordata-name). - An effective CSS selector might target the
data-nameattribute:input[data-name="utmsource"]. - Ensure the JavaScript correctly maps
utm_sourcefrom the cookie toinput[data-name="utmsource"]on the form, and similarly for the other UTM parameters.
- Identifying CSS Selectors: Re-use Chrome Developer Tools. Right-click on a hidden form field (you might need to temporarily unhide it or inspect its surrounding HTML to find its
- Read the
- Name the Tag: Name this tag descriptively, such as "HTML – Populate Hidden UTM Fields."
Chronology of Action: Optimizing the Trigger for Form Readiness
- Select Trigger Configuration: Create a new trigger for this tag.
- Choose Trigger Type: This tag must fire after the entire form HTML has been rendered and made available in the browser’s Document Object Model (DOM). Therefore, select "DOM Ready" as the trigger type. This is distinct from "Page View," which fires earlier.
- Define Trigger Condition: This tag should only fire on pages where your ActiveCampaign form is present. Choose "Some DOM Ready Events" and set the condition to
Page Path contains crm-leads(or the specific URL path of your form page). - Name and Save: Name the trigger (e.g., "DOM Ready – CRM Leads Form") and save both the trigger and the tag.
Verification and Deployment: Ensuring Data Integrity
Thorough testing is crucial to confirm that the entire system functions as intended before deploying it live.

Chronology of Action: Testing the Implementation

- Enter GTM Preview Mode: In your GTM workspace, click "Preview."
- Simulate User Journey:
- Enter a URL for your website that includes all the UTM parameters (e.g.,
yourwebsite.com?utm_source=google&utm_medium=cpc&utm_campaign=summer_sale&utm_content=banner&utm_term=shoes). - Connect the GTM Tag Assistant.
- Verify that the "HTML – Set UTM Cookie" tag fires successfully on the landing page.
- Navigate to a different page on your website (the UTM parameters should disappear from the URL).
- Open Developer Tools, go to the "Application" tab, and inspect "Cookies" for your domain. Confirm that a
source_querycookie exists and contains the correct UTM values. - Navigate to the page hosting your ActiveCampaign signup form.
- Verify that the "HTML – Populate Hidden UTM Fields" tag fires successfully on this page (and after the "DOM Ready" event).
- Using Developer Tools, inspect the hidden UTM input fields within your form. Temporarily change their
type="hidden"back totype="text"to make them visible. Confirm that they are pre-populated with the UTM values from the cookie.
- Enter a URL for your website that includes all the UTM parameters (e.g.,
- Submit a Test Lead: Fill out the visible Name and Email fields on the form and submit it.
- Verify in ActiveCampaign: Go to your ActiveCampaign "Contacts" section. Locate the new test contact. Confirm that the custom UTM fields within their profile are populated with the correct lead source information.
Chronology of Action: Deploying Live

- Submit GTM Container: Once all tests are successful, return to your GTM workspace and click the "Submit" button.
- Provide Version Details: Enter a descriptive "Version Name" (e.g., "Implement ActiveCampaign UTM Tracking") and a "Version Description" outlining the changes.
- Publish: Click "Publish" to make your GTM implementation live for all website visitors.
Broader Horizons and Future Enhancements
While this technique provides robust lead source tracking, the field of attribution is constantly evolving. This implementation serves as a strong foundation, but further enhancements can be considered:

- Expanded Source Capture: Beyond UTMs, consider capturing the
referrer(the previous page a user visited) or direct traffic for a more complete picture of how users arrive at your site. - Integrating Click IDs: For advanced advertising platforms, capturing Google Click ID (GCLID) or Facebook Click ID (FBCLID) allows for more granular, click-level attribution and enables sophisticated offline conversion tracking. This can link CRM data directly back to specific ad clicks.
- Simplified Solutions: For businesses seeking to streamline this complex setup, specialized tools are emerging. For instance, the SourceLink App (as mentioned in the original article) aims to automate this entire process, eliminating the need for manual HTML modification or intricate GTM configurations. Such tools represent a significant leap towards simplified, accurate attribution data directly within your CRM.
Conclusion
Accurate lead source tracking is no longer a luxury but a strategic necessity for effective digital marketing. By meticulously implementing custom fields in ActiveCampaign, embedding a carefully configured form, and leveraging Google Tag Manager to persist and populate UTM parameters via first-party cookies, businesses can achieve unparalleled clarity into their marketing performance. This powerful synergy of web technologies transforms raw traffic data into actionable insights, empowering marketers to optimize their strategies, maximize their ROI, and drive sustainable growth in an increasingly data-driven world. The ability to trace every conversion back to its true origin is the cornerstone of intelligent marketing investment.
